How Serverless is Accelerating GenAI Adoption
AWS SAM introduced a new capability called AWS SAM Pipeline, which helps set up continuous integration and deployment. It allows developers to have secure and standard continuous integration and continuous deployment. In this Blog Post, we’ll see how to create a CI/CD deployment pipeline configuration with AWS SAM Pipeline for GitHub Actions and deploying it.
Introduction
Pipelines have a configuration file ( generally in YAML ) that contains a set of steps required for the deployment. Previously, we had to create the pipeline entity manually. But now, we can set up the pipeline entity using the AWS SAM Pipeline capability. It also provides a default pipeline configuration file that can be modified based on our needs. AWS SAM currently supports the following pipeline tools:
AWS SAM Pipeline generates base templates for the tools mentioned above, which have the capability of multi-account, multi-region, multi-environment deployment. The generated pipeline file also consists of unit test and integration test configuration.
Getting Started
Initialising the SAM Pipeline is done by using the following commands
sam pipeline bootstrap
sam pipeline bootstrap is used to create resources like IAM roles, etc., required for the pipeline.
sam pipeline init
sam pipeline init is used to create the pipeline template file for the selected CI/CD tool.
Or we can combine these commands and use which will be
sam pipeline init --bootstrap
This command will guide us through the bootstrap steps and initialization of our pipeline.
Demo
Now we will create a sample project using AWS SAM and create a pipeline for GitHub actions.
Prerequisites
- An AWS account with necessary permissions and IAM credentials.
- IAM role with proper permission and trust policy(like sts:assumerole).
- AWS SAM CLI(^1.27.2) installed and AWS credentials configured.
- A GitHub account with the required access.
Step 1: Create a SAM Project
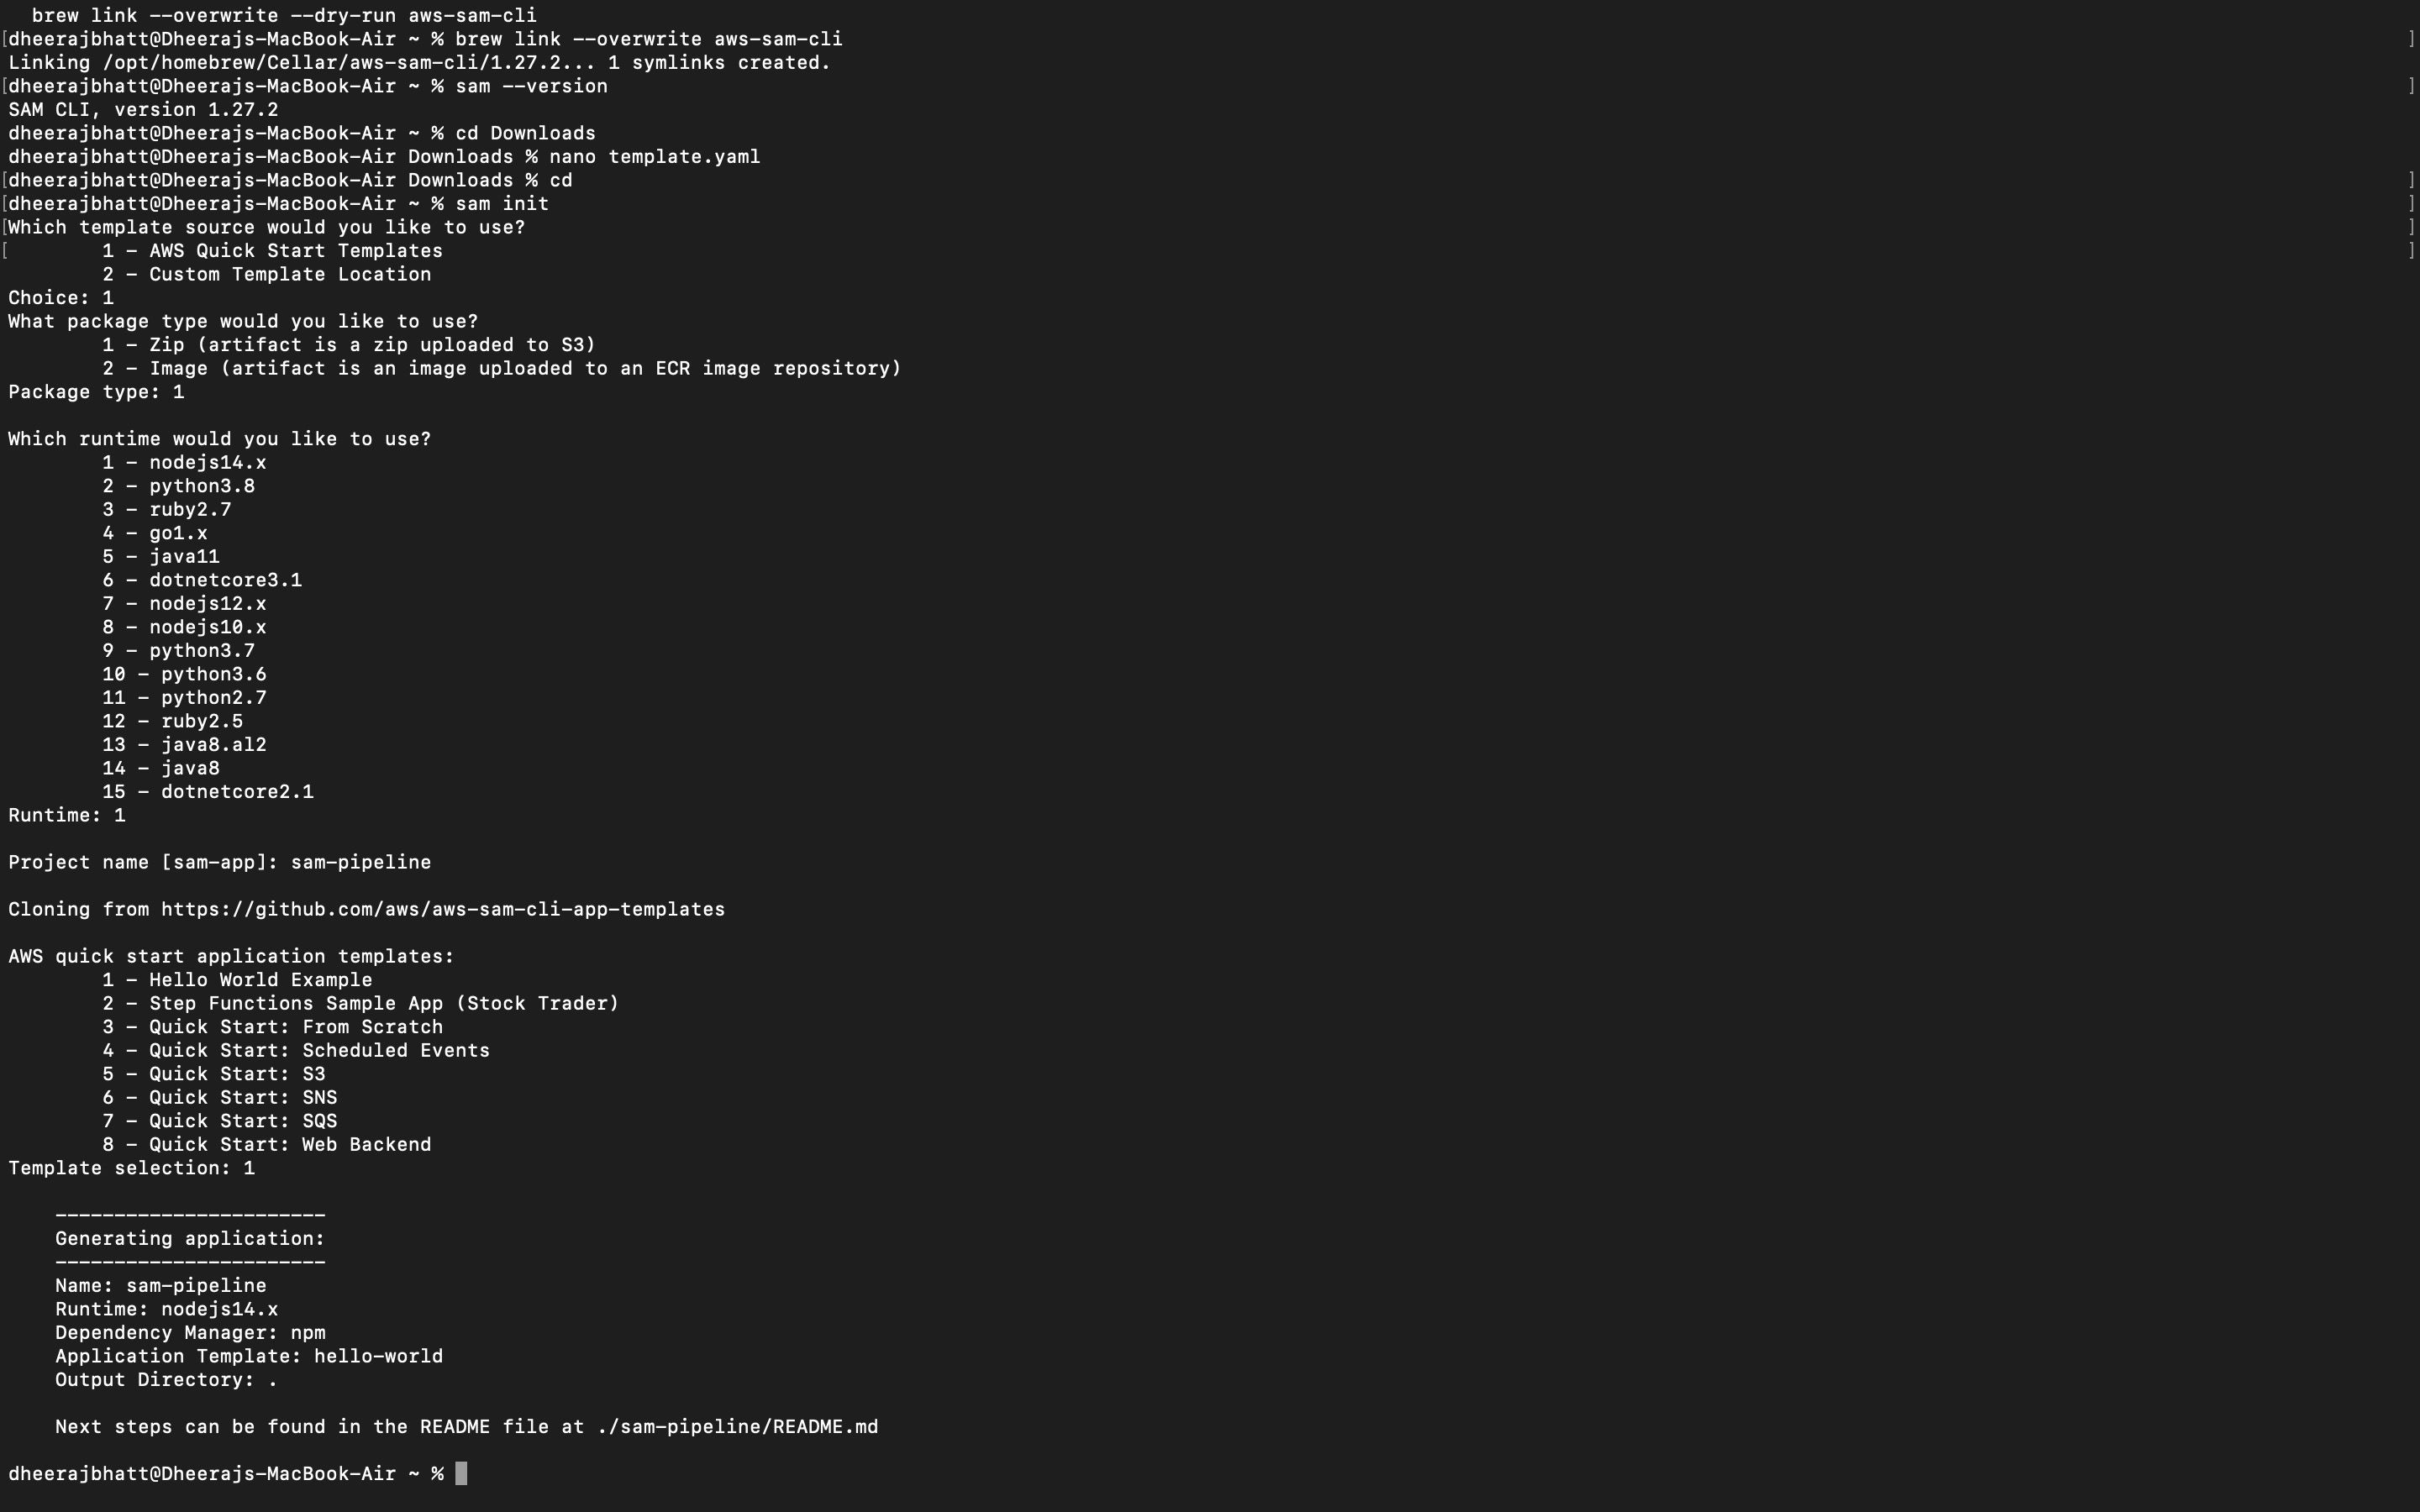
We can create a sample project using the sam init command. This will guide us through a series of questions about the template, code language, and AWS services. So we will be selecting a basic hello world application in “node js” with AWS quick start template.
sam init
This will generate a basic SAM project folder
Step 2 : Create a pipeline
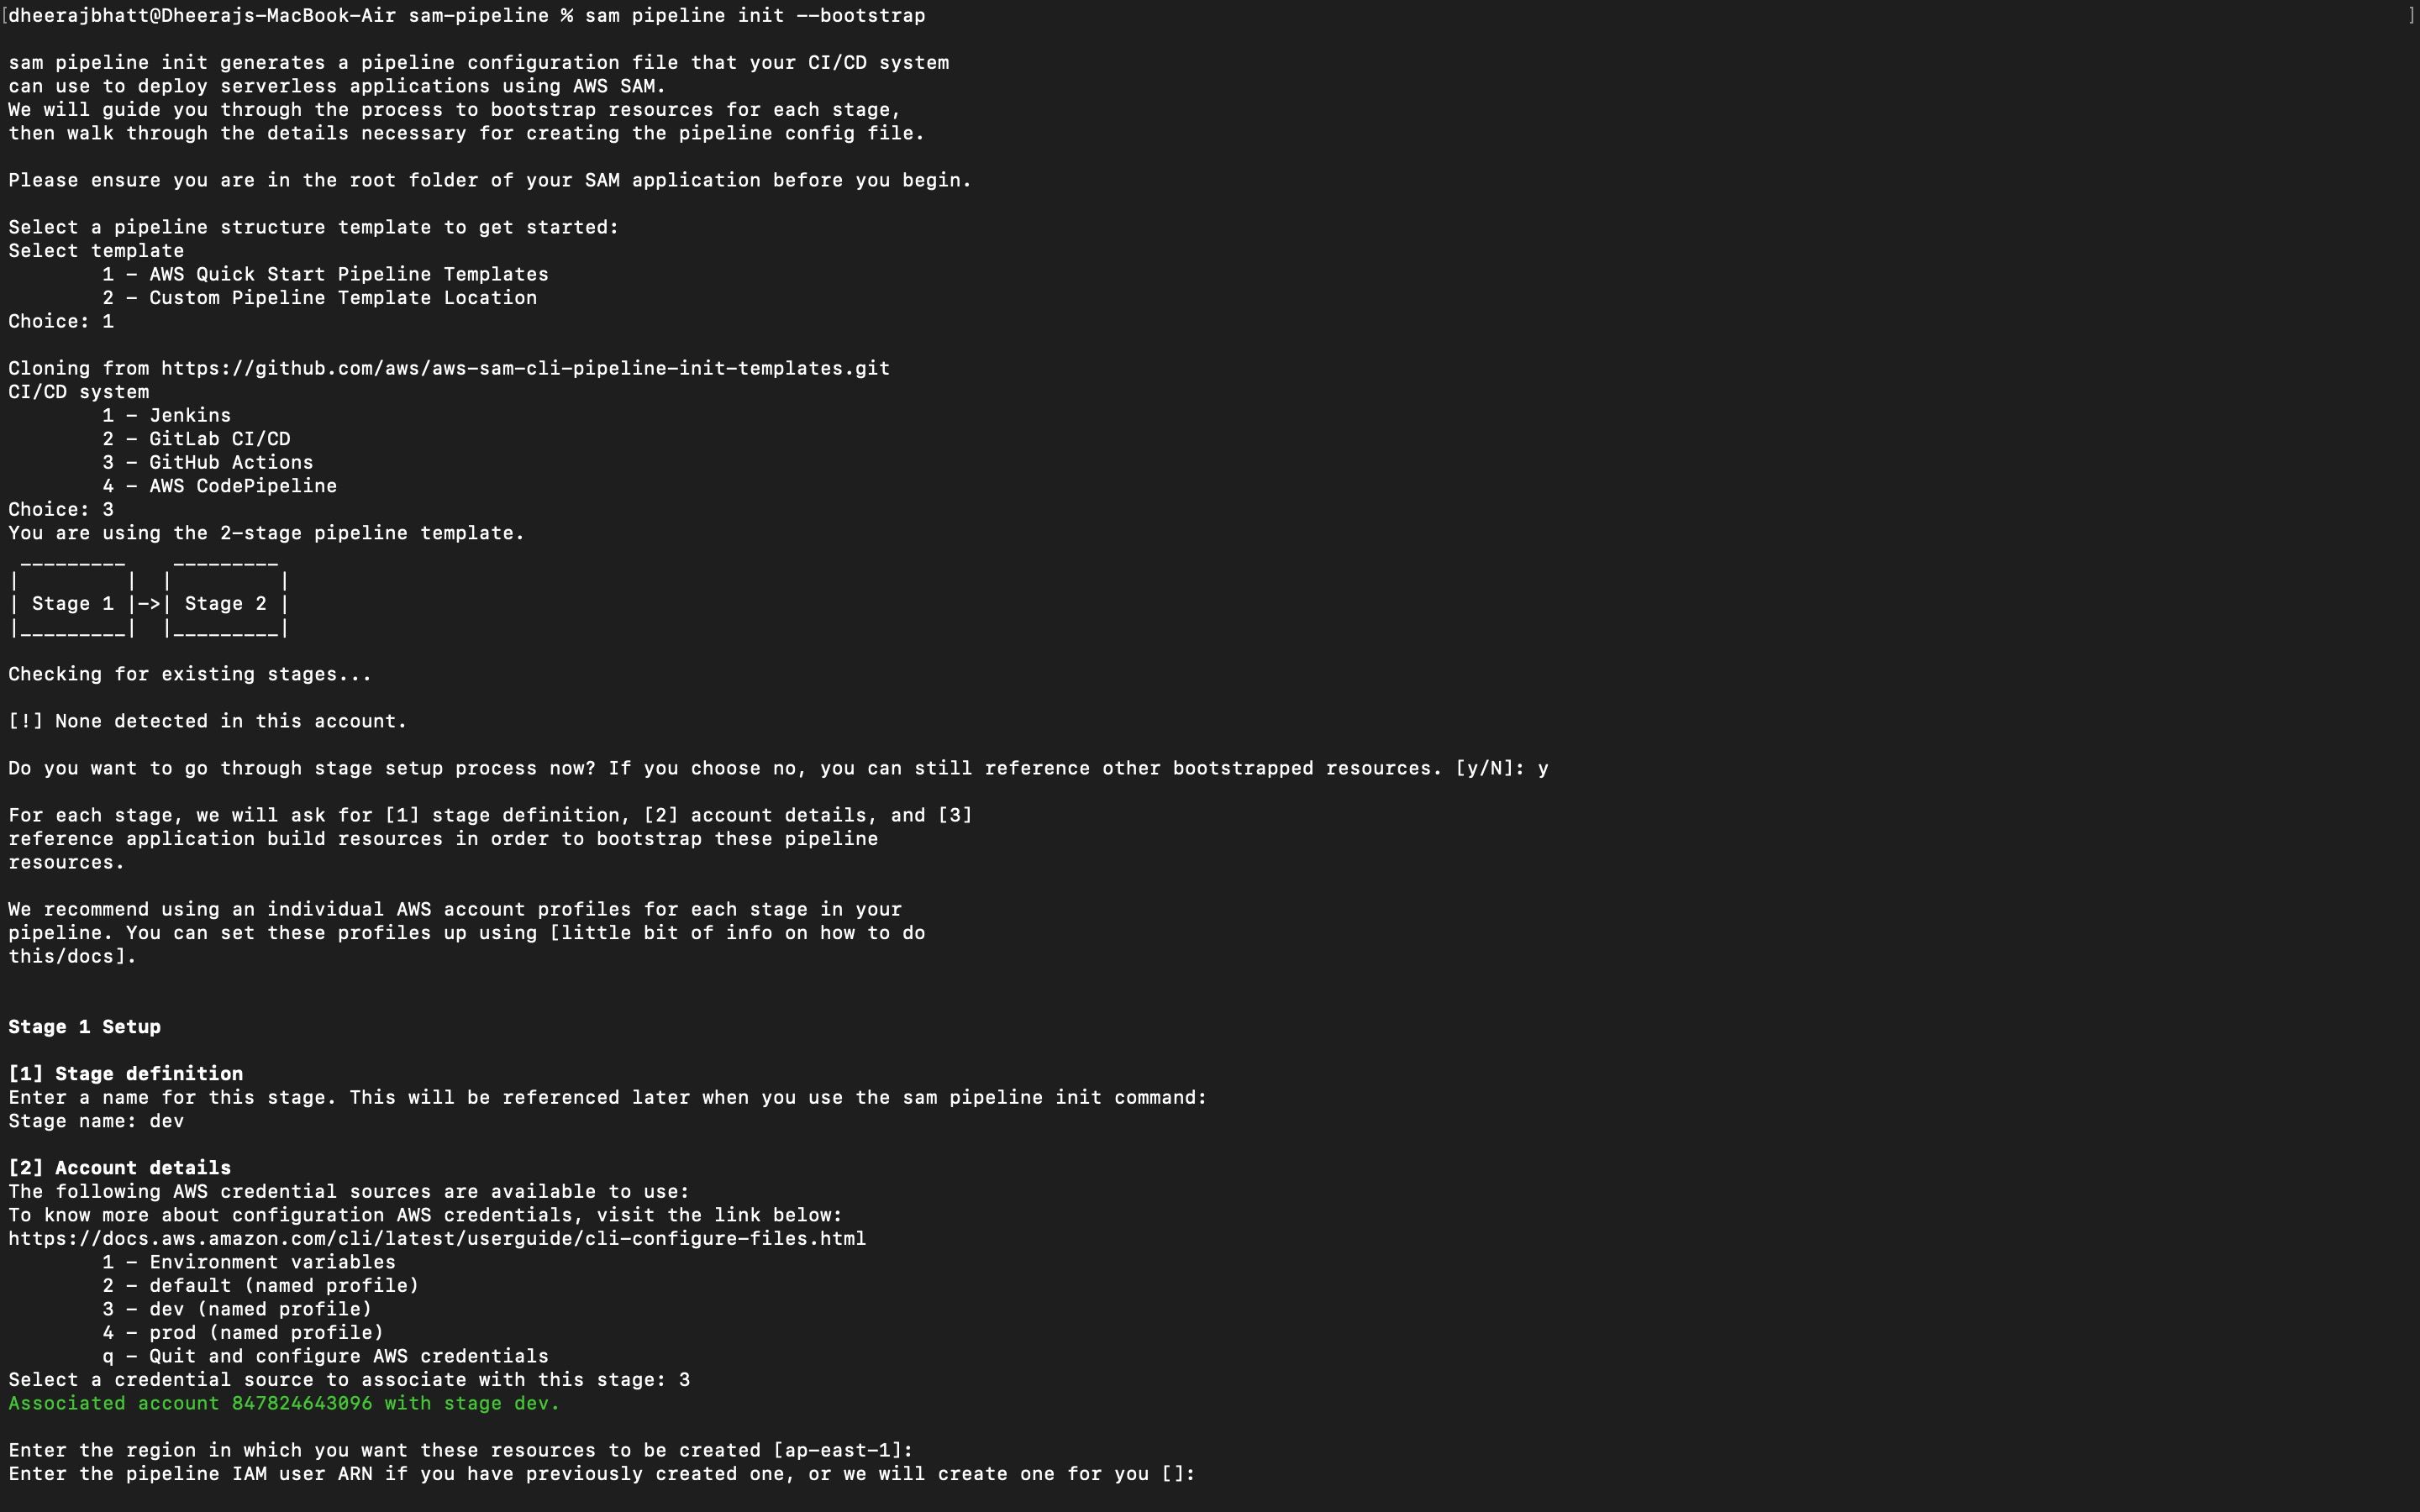
Change the directory to the previously created SAM project folder using cd folder-name (cd sam-pipeline). We can create a pipeline in 2 ways, one by using sam pipeline bootstrap and sam pipeline init separately or by a single command sam pipeline init —bootstrap. We will be using sam pipeline init --bootstrap.
sam pipeline init --bootstrap
This will guide us through series of questions similar to the ones mentioned below:
- Template type,
- CI/CD system,
- Stage setup details like a stage name, AWS credentials for the stage, region of the stage and ARN of pipeline IAM role,
- ARN of pipeline execution role, Cloudformation execution role, and artifact bucket(s3 deployment bucket ) and ask for any Image type Lambda function in our application.
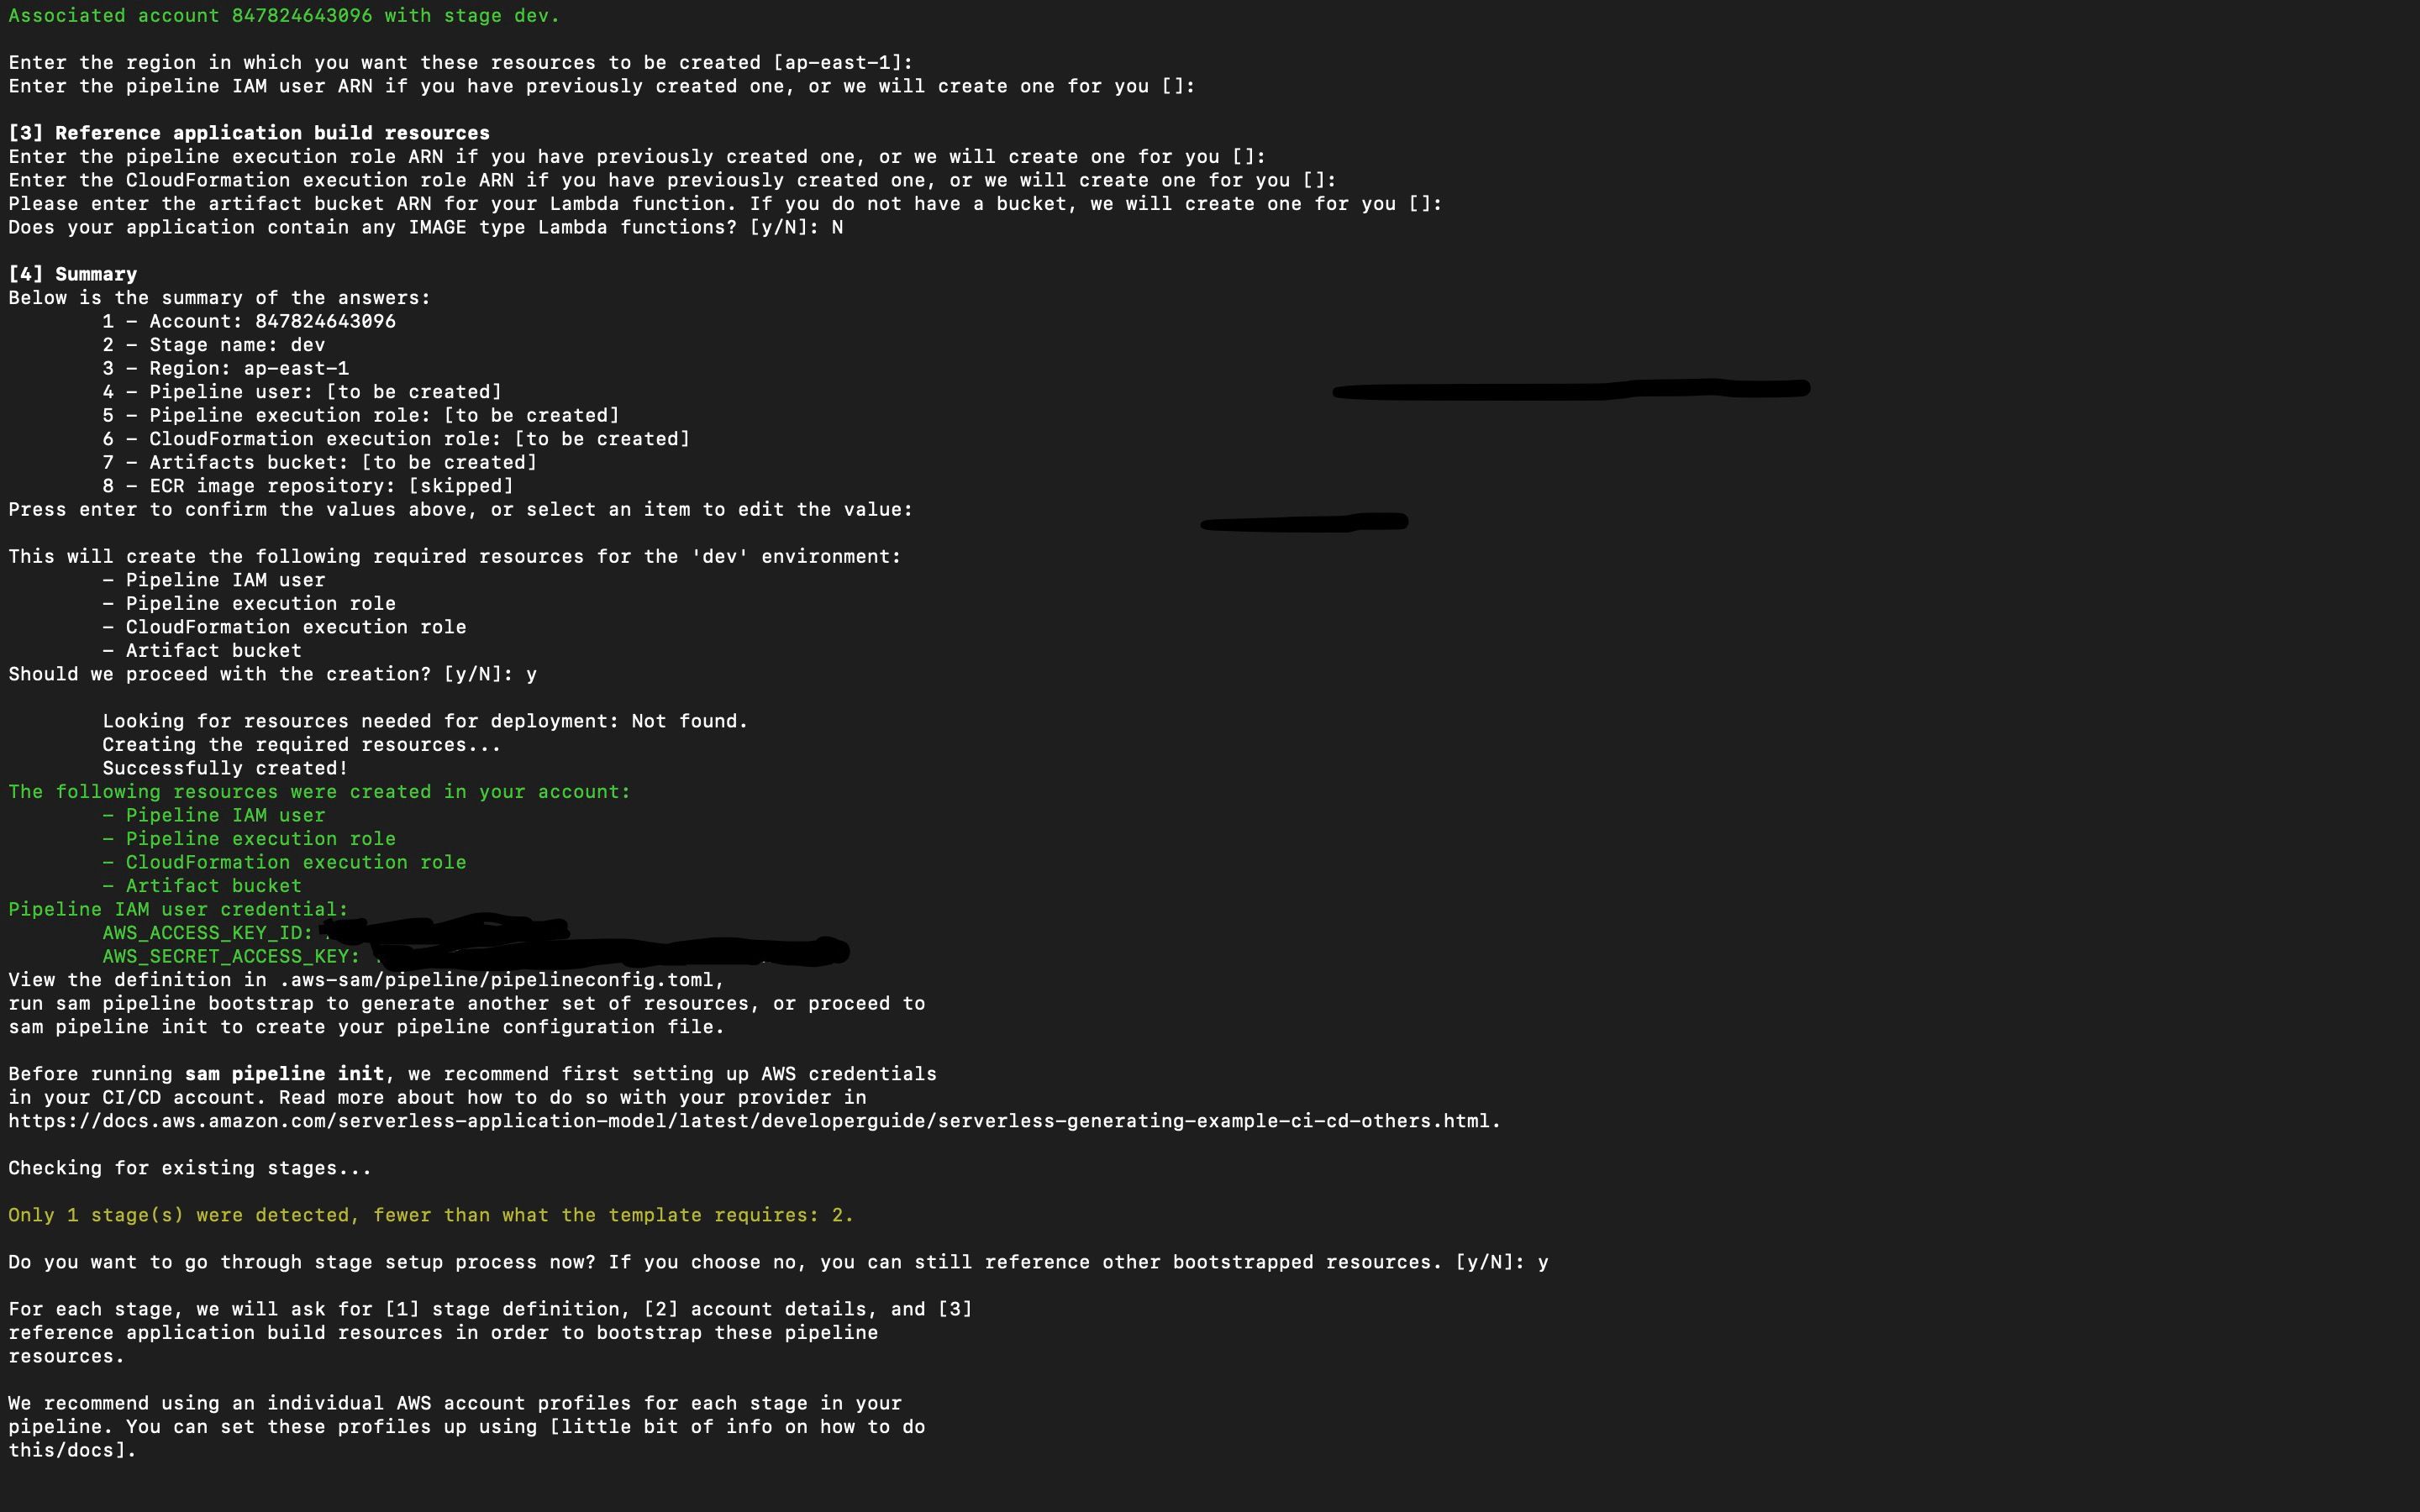
Then it generates the summary in the CLI and prompts for confirmation. Post that, it will give us the list of resources that would be created and prompts for confirmation. Once they are confirmed, the next same steps would be repeated for the second stage.
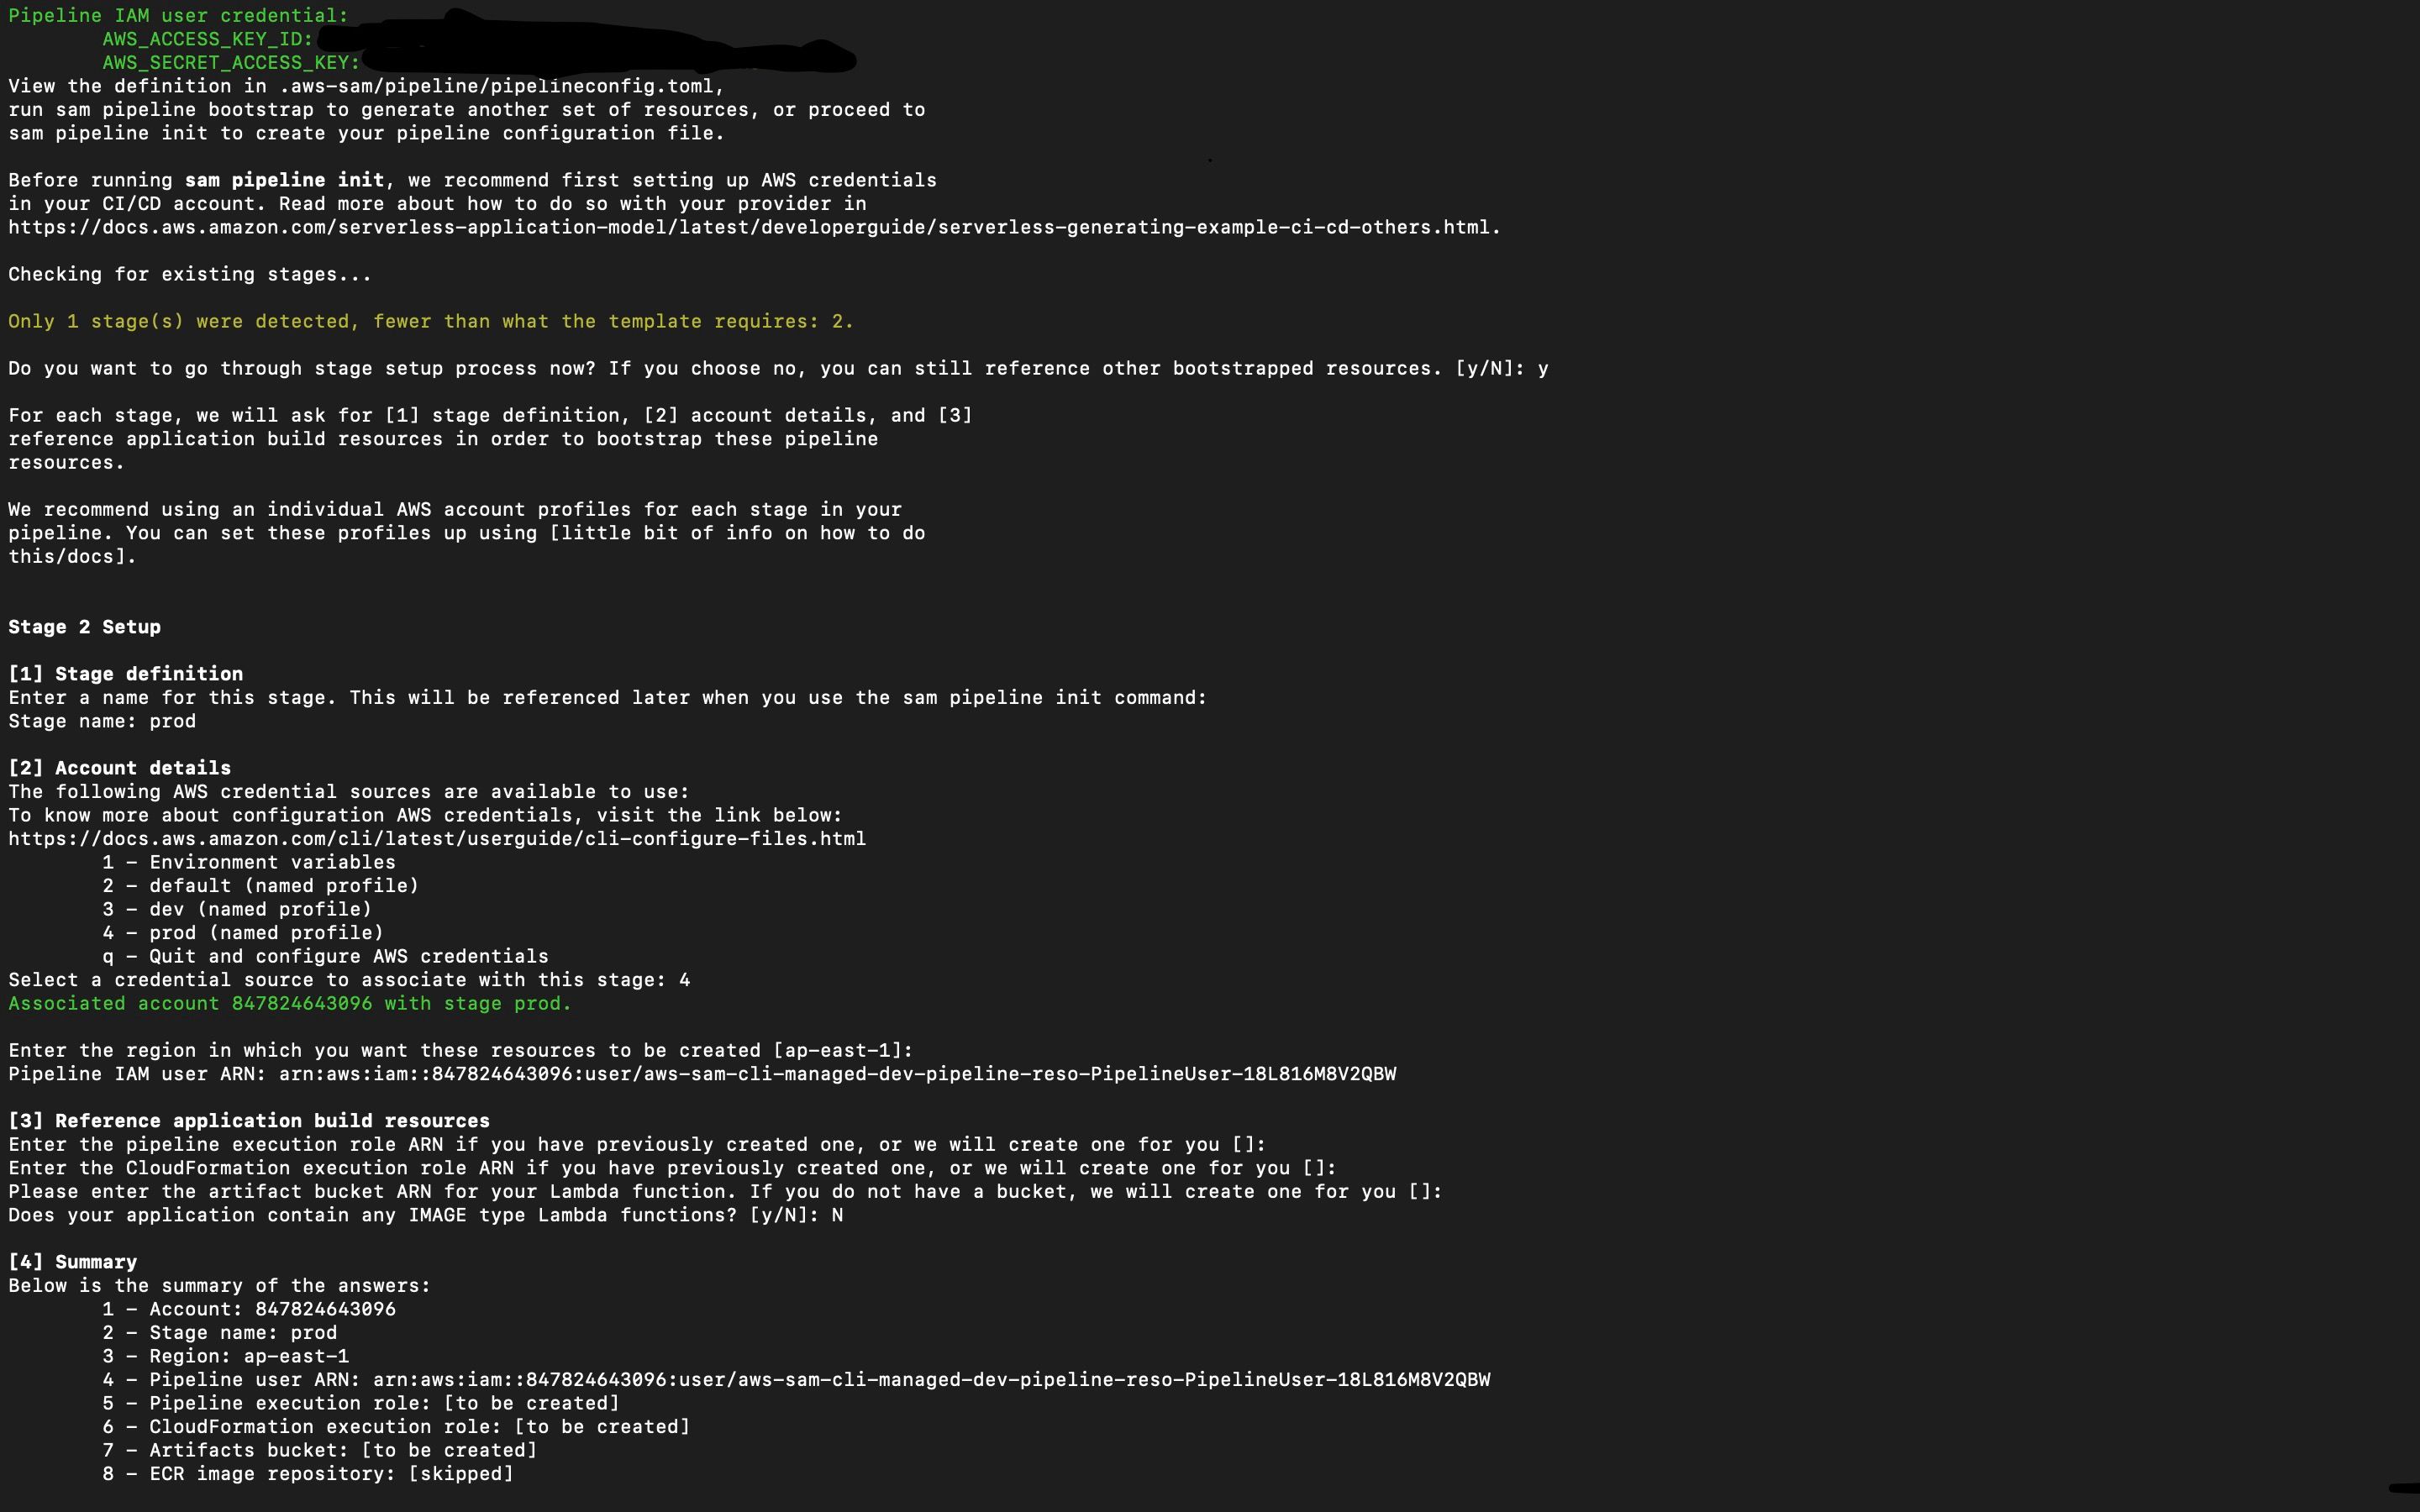
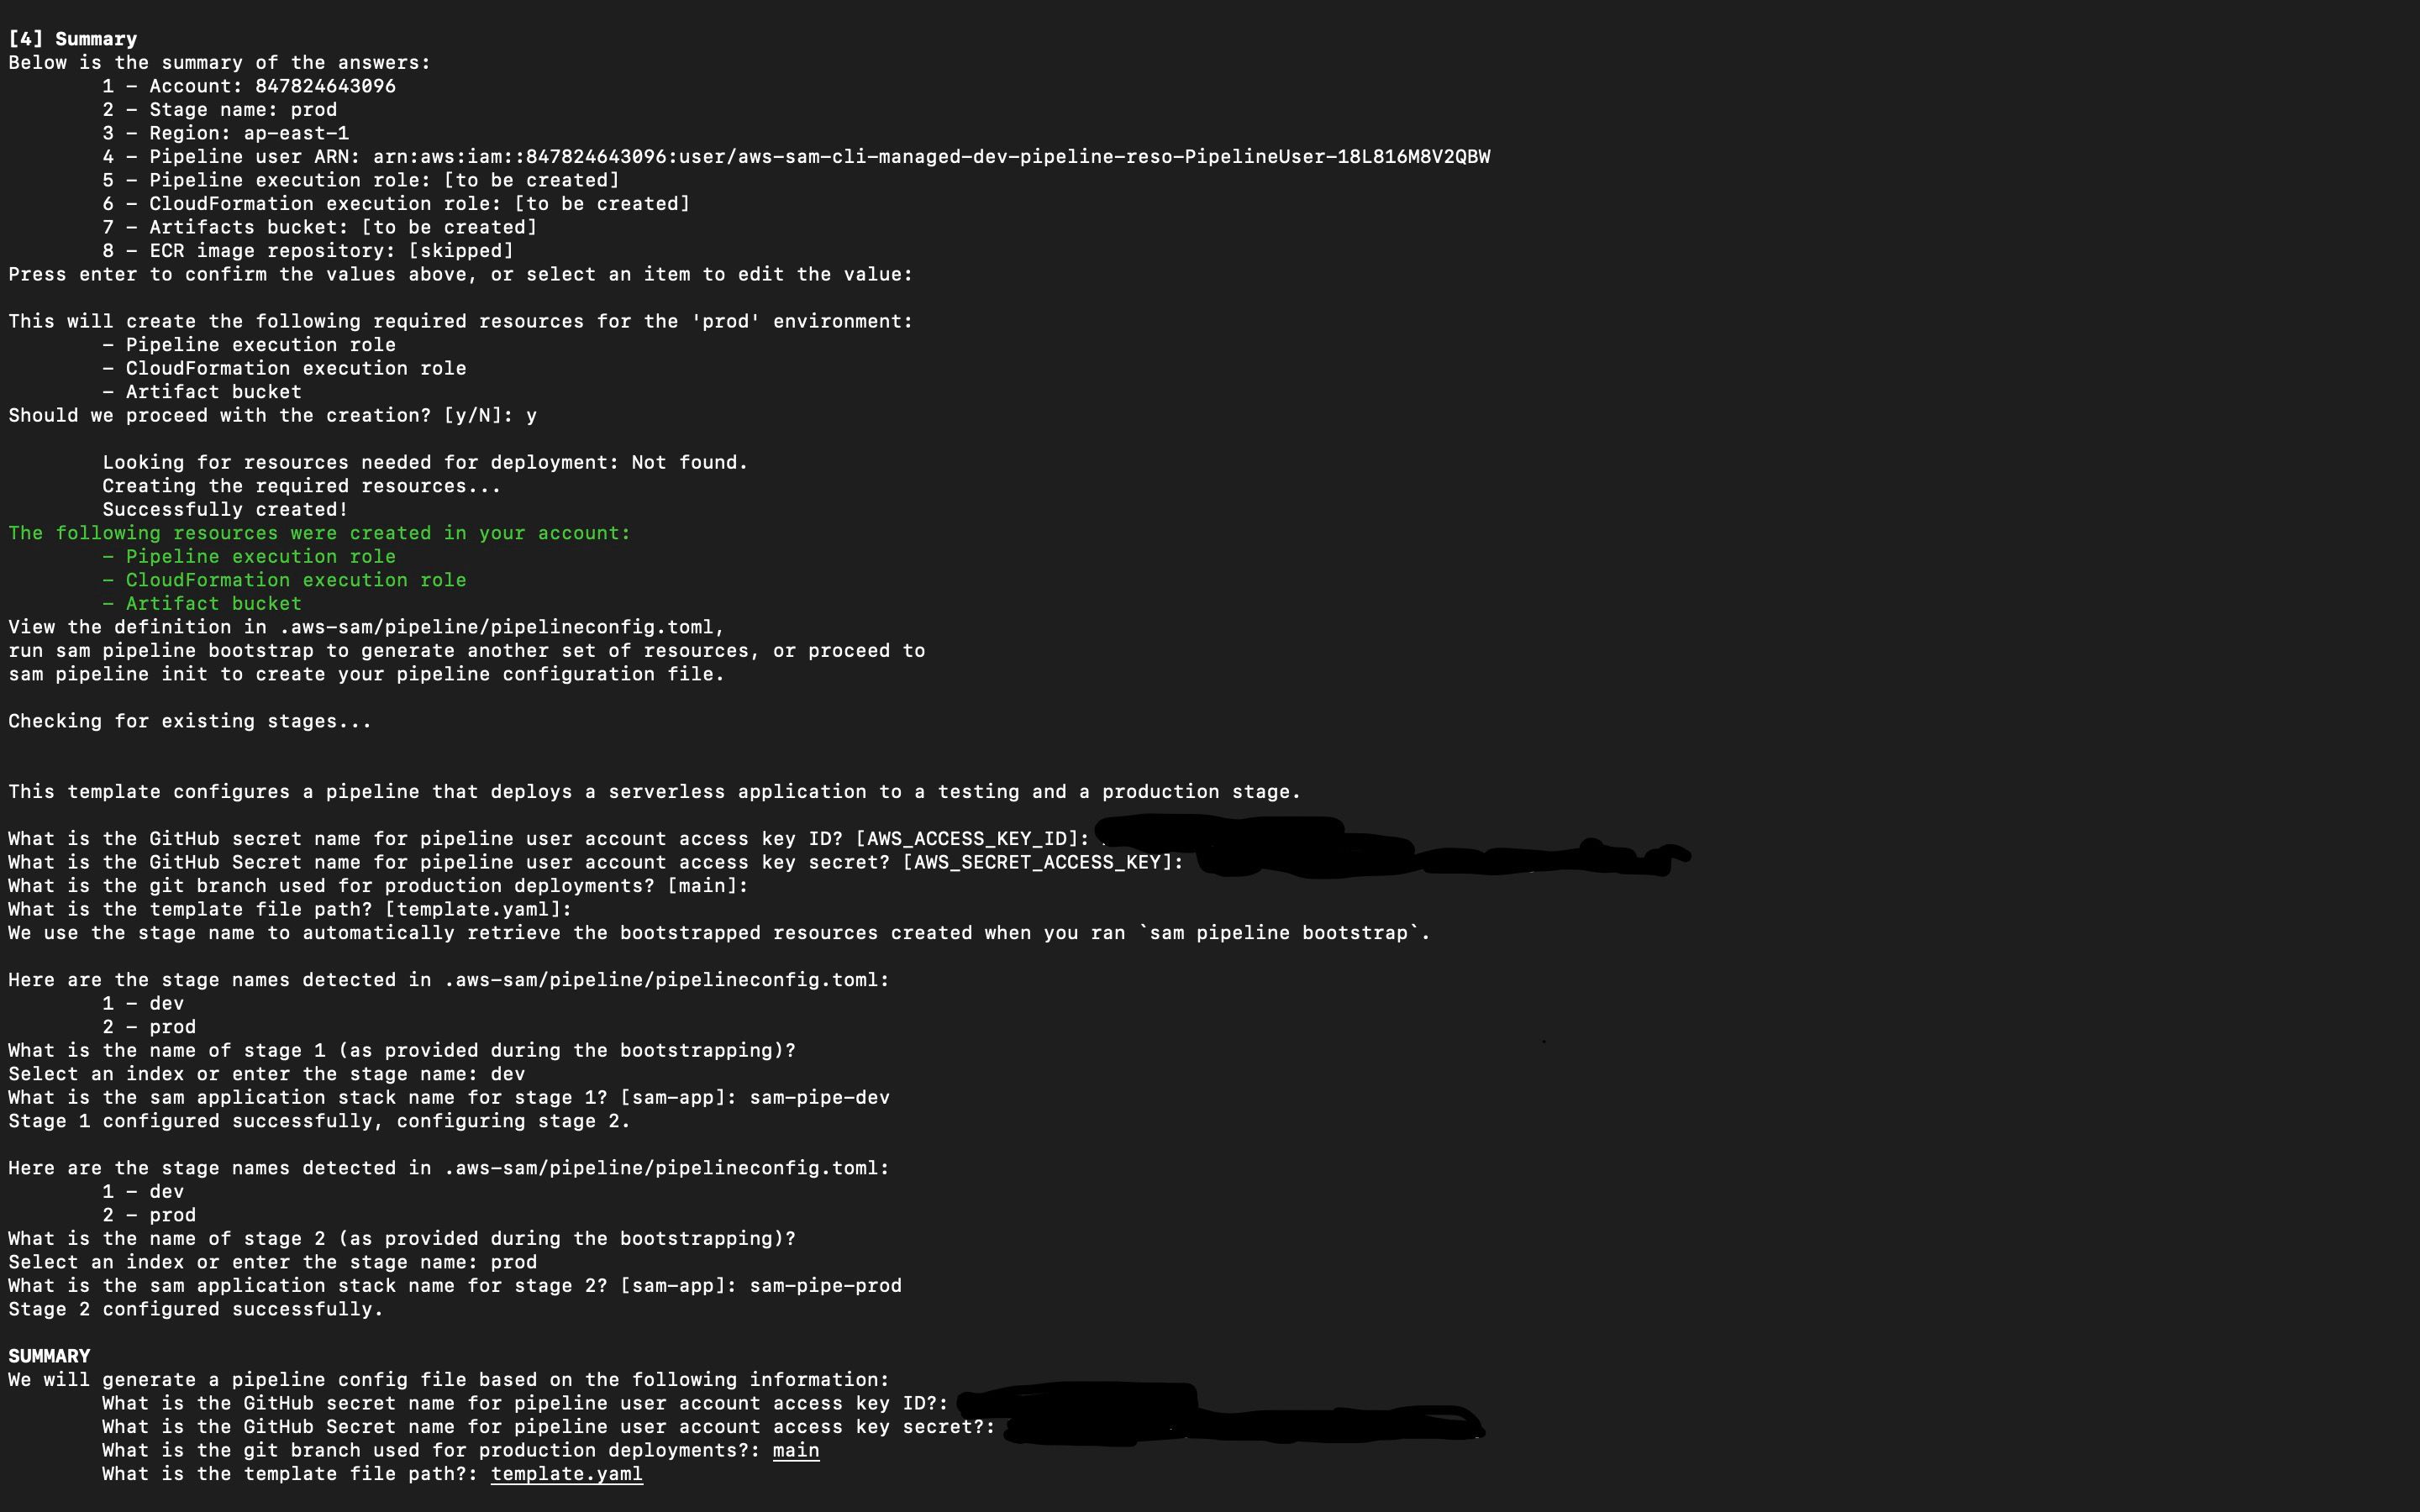
Then it will ask for
- The variable for AWS credentials that are set in GitHub Secrets,
- Branch name
- Template path.
- Then we have to set the stack name for both stages.
- Then the summary would be generated and the pipeline file would be created.
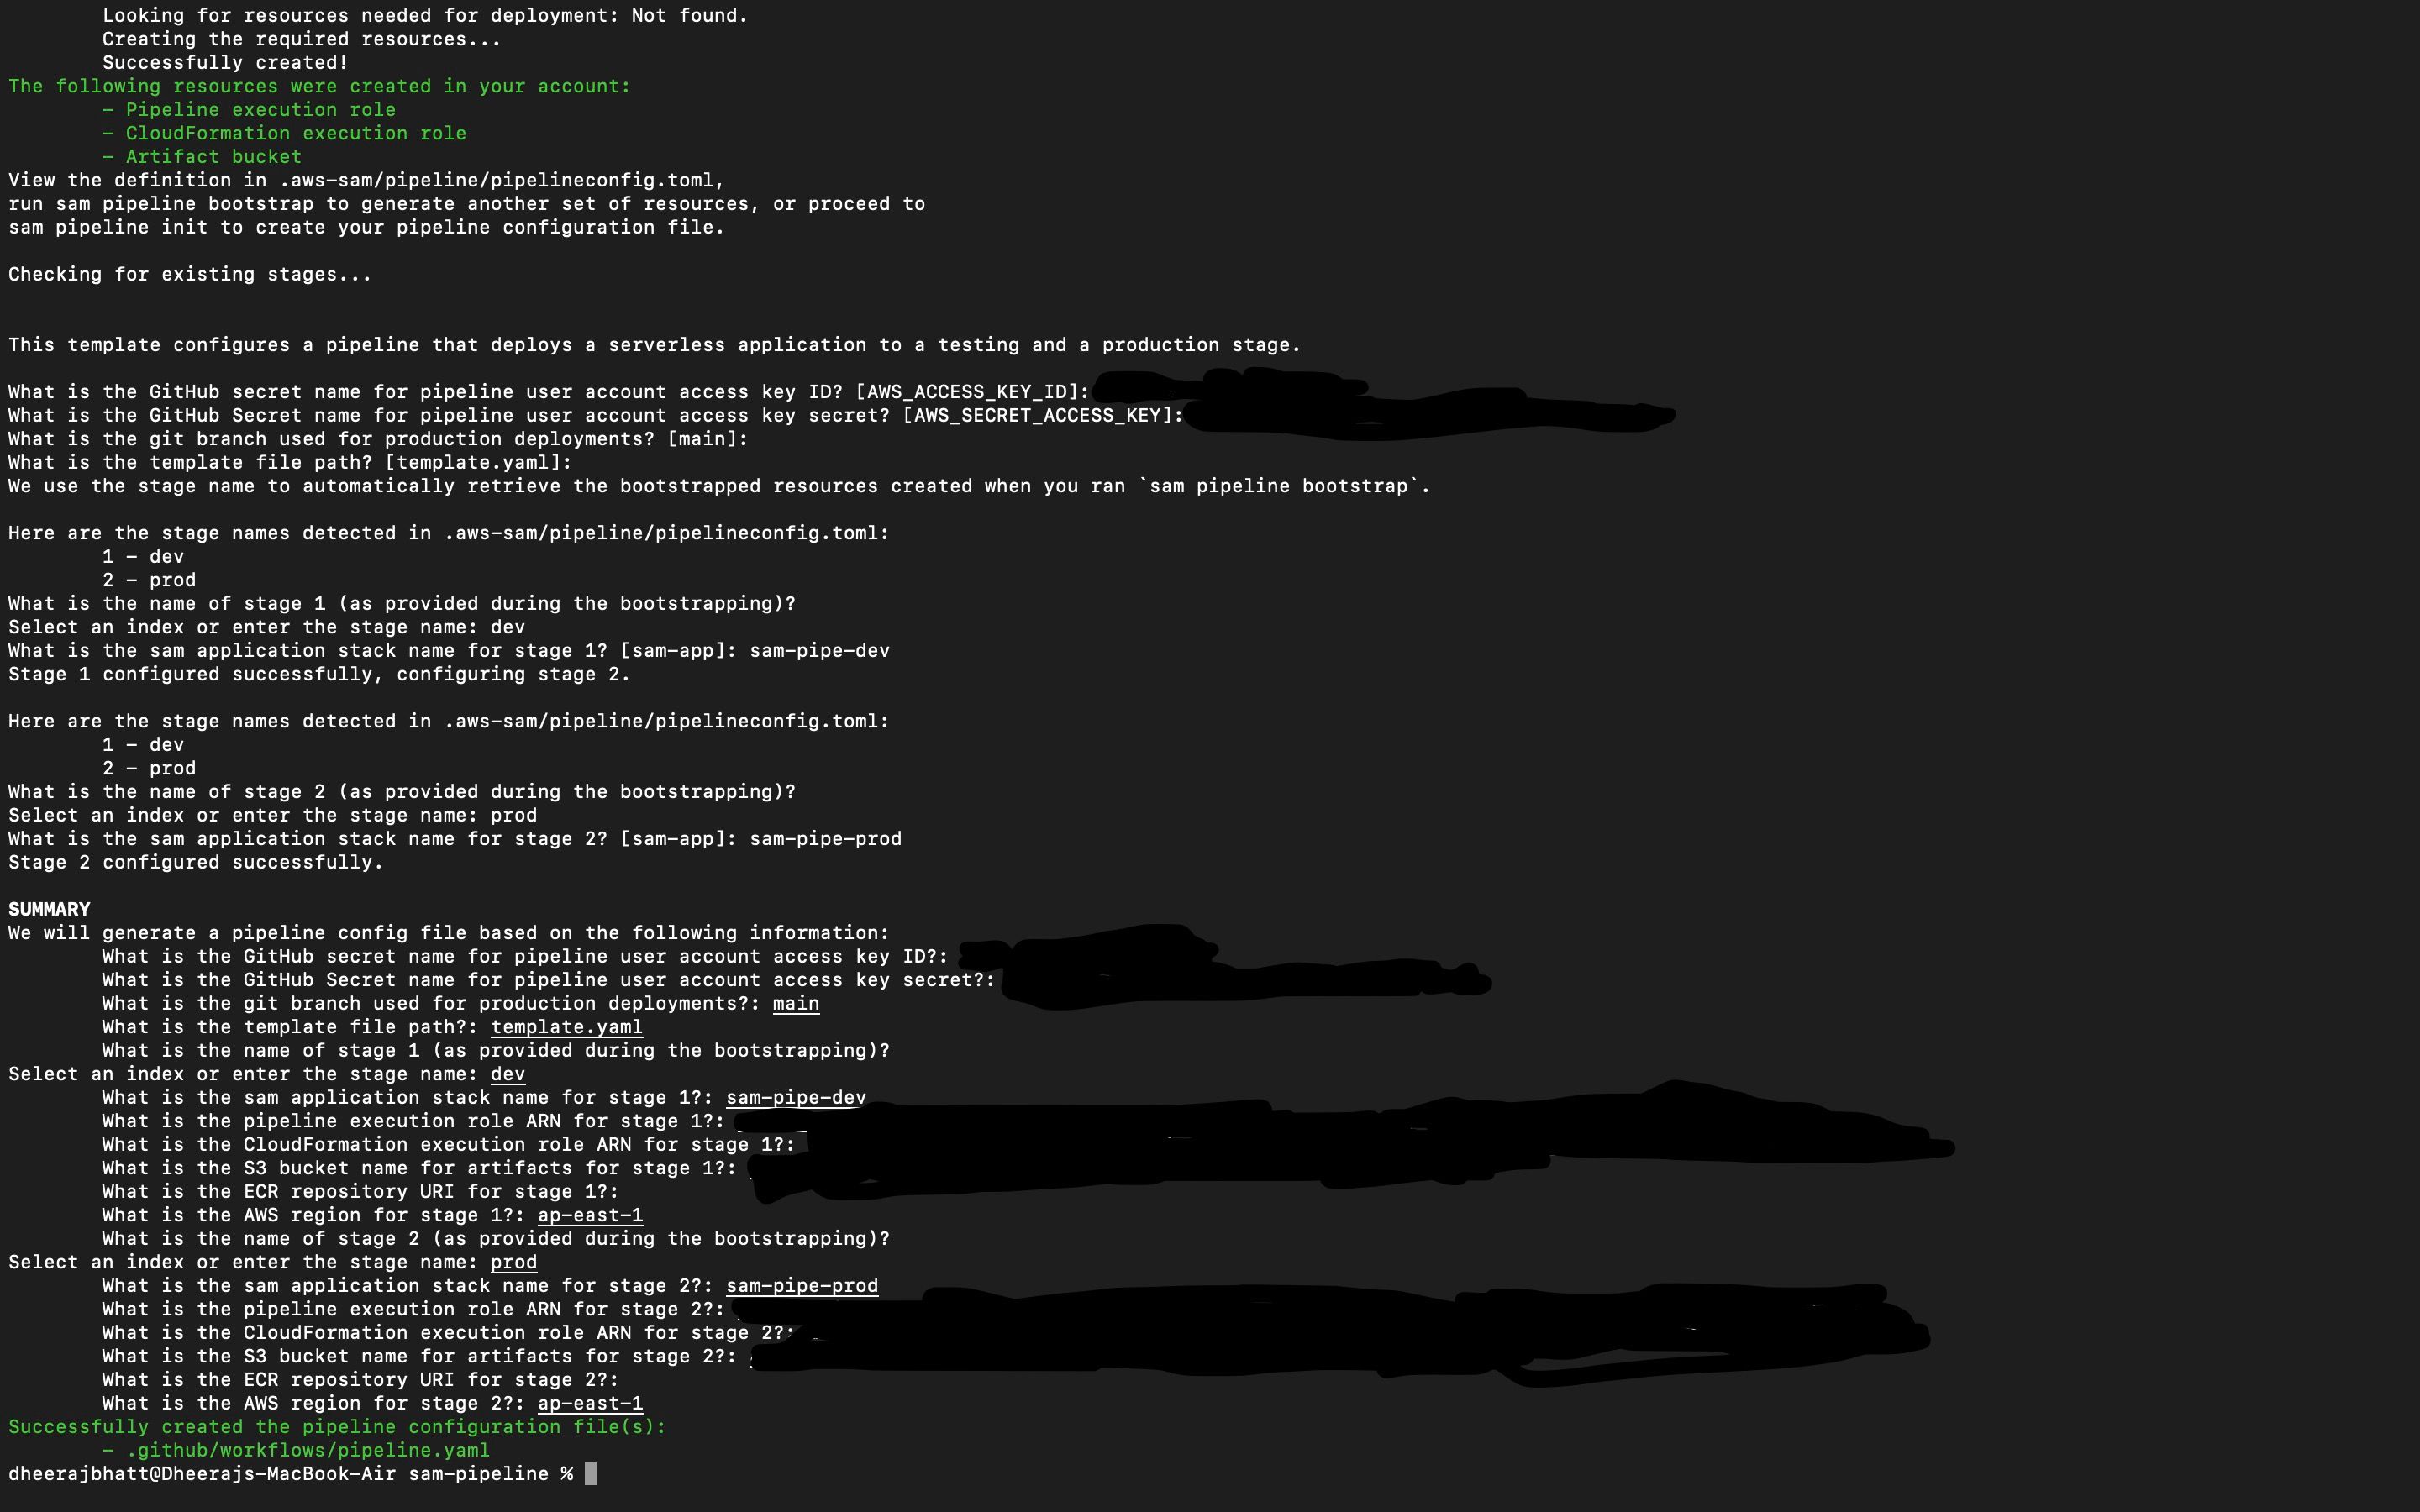
We can find our pipeline file in project root folder(sam-pipeline) -> .github -> workflows -> pipeline.yaml
name: Pipeline

on:
 push:
  branches:
   - 'main'
   - 'feature**'

env:
 PIPELINE_USER_ACCESS_KEY_ID: ${{ secrets.AWS_ACCESS_KEY_ID }}
 PIPELINE_USER_SECRET_ACCESS_KEY: ${{ secrets.AWS_SECRET_ACCESS_KEY }}
 SAM_TEMPLATE: template.yaml
 TESTING_STACK_NAME: sam-pipe-dev
 TESTING_PIPELINE_EXECUTION_ROLE: arn:aws:iam::873102235883:role/aws-sam-cli-managed-dev-pipe-PipelineExecutionRole-1BZ0FKI54CHJS
 TESTING_CLOUDFORMATION_EXECUTION_ROLE: arn:aws:iam::873102235883:role/aws-sam-cli-managed-dev-p-CloudFormationExecutionR-11V9XWH0REEJY
 TESTING_ARTIFACTS_BUCKET: aws-sam-cli-managed-dev-pipeline-artifactsbucket-1o1zu57ix6voz
 # If there are functions with "Image" PackageType in your template,
 # uncomment the line below and add "--image-repository ${TESTING_IMAGE_REPOSITORY}" to
 # testing "sam package" and "sam deploy" commands.
 # TESTING_IMAGE_REPOSITORY = '0123456789.dkr.ecr.region.amazonaws.com/repository-name'
 TESTING_REGION: us-east-1
 PROD_STACK_NAME: sam-pipe-prod
 PROD_PIPELINE_EXECUTION_ROLE: arn:aws:iam::873102235883:role/aws-sam-cli-managed-prod-pip-PipelineExecutionRole-17TA8BON3J5TL
 PROD_CLOUDFORMATION_EXECUTION_ROLE: arn:aws:iam::873102235883:role/aws-sam-cli-managed-prod-CloudFormationExecutionR-4ELX81KWLFDR
 PROD_ARTIFACTS_BUCKET: aws-sam-cli-managed-prod-pipeline-artifactsbucket-2s54z0yc7620
 # If there are functions with "Image" PackageType in your template,
 # uncomment the line below and add "--image-repository ${PROD_IMAGE_REPOSITORY}" to
 # prod "sam package" and "sam deploy" commands.
 # PROD_IMAGE_REPOSITORY = '0123456789.dkr.ecr.region.amazonaws.com/repository-name'
 PROD_REGION: us-east-1

jobs:
 test:
  runs-on: ubuntu-latest
  steps:
   - uses: actions/checkout@v2
   - run: |
     # trigger the tests here

 build-and-deploy-feature:
  # this stage is triggered only for feature branches (feature*),
  # which will build the stack and deploy to a stack named with branch name.
  if: startsWith(github.ref, 'refs/heads/feature')
  needs: [test]
  runs-on: ubuntu-latest
  steps:
   - uses: actions/checkout@v2
   - uses: actions/setup-python@v2
   - uses: aws-actions/setup-sam@v1
   - run: sam build --template ${SAM_TEMPLATE} --use-container

   - name: Assume the testing pipeline user role
    uses: aws-actions/configure-aws-credentials@v1
    with:
      aws-access-key-id: ${{ env.PIPELINE_USER_ACCESS_KEY_ID }}
      aws-secret-access-key: ${{ env.PIPELINE_USER_SECRET_ACCESS_KEY }}
      aws-region: ${{ env.TESTING_REGION }}
     role-to-assume: ${{ env.TESTING_PIPELINE_EXECUTION_ROLE }}
     role-session-name: feature-deployment
     role-duration-seconds: 3600
     role-skip-session-tagging: true

   - name: Deploy to feature stack in the testing account
    shell: bash
    run: |
     sam deploy --stack-name $(echo ${GITHUB_REF##*/} | tr -cd '[a-zA-Z0-9-]') \
      --capabilities CAPABILITY_IAM \
      --region ${TESTING_REGION} \
      --s3-bucket ${TESTING_ARTIFACTS_BUCKET} \
      --no-fail-on-empty-changeset \
      --role-arn ${TESTING_CLOUDFORMATION_EXECUTION_ROLE}

 build-and-package:
  if: github.ref == 'refs/heads/main'
  needs: [test]
  runs-on: ubuntu-latest
  steps:
   - uses: actions/checkout@v2
   - uses: actions/setup-python@v2
   - uses: aws-actions/setup-sam@v1

   - name: Build resources
    run: <a href="https://www.antstack.com/blog/building-serverless-application-with-aws-sam-and-typescript/" target="_blank">sam build</a> --template ${SAM_TEMPLATE} --use-container

   - name: Assume the testing pipeline user role
    uses: aws-actions/configure-aws-credentials@v1
    with:
      aws-access-key-id: ${{ env.PIPELINE_USER_ACCESS_KEY_ID }}
      aws-secret-access-key: ${{ env.PIPELINE_USER_SECRET_ACCESS_KEY }}
      aws-region: ${{ env.TESTING_REGION }}
     role-to-assume: ${{ env.TESTING_PIPELINE_EXECUTION_ROLE }}
     role-session-name: testing-packaging
     role-duration-seconds: 3600
     role-skip-session-tagging: true

   - name: Upload artifacts to testing artifact buckets
    run: |
     sam package \
      --s3-bucket ${TESTING_ARTIFACTS_BUCKET} \
      --region ${TESTING_REGION} \
      --output-template-file packaged-testing.yaml

   - uses: actions/upload-artifact@v2
    with:
     name: packaged-testing.yaml
     path: packaged-testing.yaml

   - name: Assume the prod pipeline user role
    uses: aws-actions/configure-aws-credentials@v1
    with:
      aws-access-key-id: ${{ env.PIPELINE_USER_ACCESS_KEY_ID }}
      aws-secret-access-key: ${{ env.PIPELINE_USER_SECRET_ACCESS_KEY }}
      aws-region: ${{ env.PROD_REGION }}
     role-to-assume: ${{ env.PROD_PIPELINE_EXECUTION_ROLE }}
     role-session-name: prod-packaging
     role-duration-seconds: 3600
     role-skip-session-tagging: true

   - name: Upload artifacts to production artifact buckets
    run: |
     sam package \
      --s3-bucket ${PROD_ARTIFACTS_BUCKET} \
      --region ${PROD_REGION} \
      --output-template-file packaged-prod.yaml

   - uses: actions/upload-artifact@v2
    with:
     name: packaged-prod.yaml
     path: packaged-prod.yaml

 deploy-testing:
  if: github.ref == 'refs/heads/main'
  needs: [build-and-package]
  runs-on: ubuntu-latest
  steps:
   - uses: actions/checkout@v2
   - uses: actions/setup-python@v2
   - uses: aws-actions/setup-sam@v1
   - uses: actions/download-artifact@v2
    with:
     name: packaged-testing.yaml

   - name: Assume the testing pipeline user role
    uses: aws-actions/configure-aws-credentials@v1
    with:
      aws-access-key-id: ${{ env.PIPELINE_USER_ACCESS_KEY_ID }}
      aws-secret-access-key: ${{ env.PIPELINE_USER_SECRET_ACCESS_KEY }}
      aws-region: ${{ env.TESTING_REGION }}
     role-to-assume: ${{ env.TESTING_PIPELINE_EXECUTION_ROLE }}
     role-session-name: testing-deployment
     role-duration-seconds: 3600
     role-skip-session-tagging: true

   - name: Deploy to testing account
    run: |
     sam deploy --stack-name ${TESTING_STACK_NAME} \
      --template packaged-testing.yaml \
      --capabilities CAPABILITY_IAM \
      --region ${TESTING_REGION} \
      --s3-bucket ${TESTING_ARTIFACTS_BUCKET} \
      --no-fail-on-empty-changeset \
      --role-arn ${TESTING_CLOUDFORMATION_EXECUTION_ROLE}

 integration-test:
  if: github.ref == 'refs/heads/main'
  needs: [deploy-testing]
  runs-on: ubuntu-latest
  steps:
   - uses: actions/checkout@v2
   - run: |
     # trigger the integration tests here

 deploy-prod:
  if: github.ref == 'refs/heads/main'
  needs: [integration-test]
  runs-on: ubuntu-latest
  # Configure GitHub Action Environment to have a manual approval step before deployment to production
  # https://docs.github.com/en/actions/reference/environments
  # environment: <configured-environment>
  steps:
   - uses: actions/checkout@v2
   - uses: actions/setup-python@v2
   - uses: aws-actions/setup-sam@v1
   - uses: actions/download-artifact@v2
    with:
     name: packaged-prod.yaml

   - name: Assume the prod pipeline user role
    uses: aws-actions/configure-aws-credentials@v1
    with:
      aws-access-key-id: ${{ env.PIPELINE_USER_ACCESS_KEY_ID }}
      aws-secret-access-key: ${{ env.PIPELINE_USER_SECRET_ACCESS_KEY }}
      aws-region: ${{ env.PROD_REGION }}
     role-to-assume: ${{ env.PROD_PIPELINE_EXECUTION_ROLE }}
     role-session-name: prod-deployment
     role-duration-seconds: 3600
     role-skip-session-tagging: true

   - name: Deploy to production account
    run: |
     sam deploy --stack-name ${PROD_STACK_NAME} \
      --template packaged-prod.yaml \
      --capabilities CAPABILITY_IAM \
      --region ${PROD_REGION} \
      --s3-bucket ${PROD_ARTIFACTS_BUCKET} \
      --no-fail-on-empty-changeset \
      --role-arn ${PROD_CLOUDFORMATION_EXECUTION_ROLE}
Step 3 : Set credentials in GitHub
Create a repository in GitHub. As we have given the variable while creating the pipeline, we have set the values for that in GitHub secrets in this repository.
GitHub-> Settings -> Secrets-> New repository secret
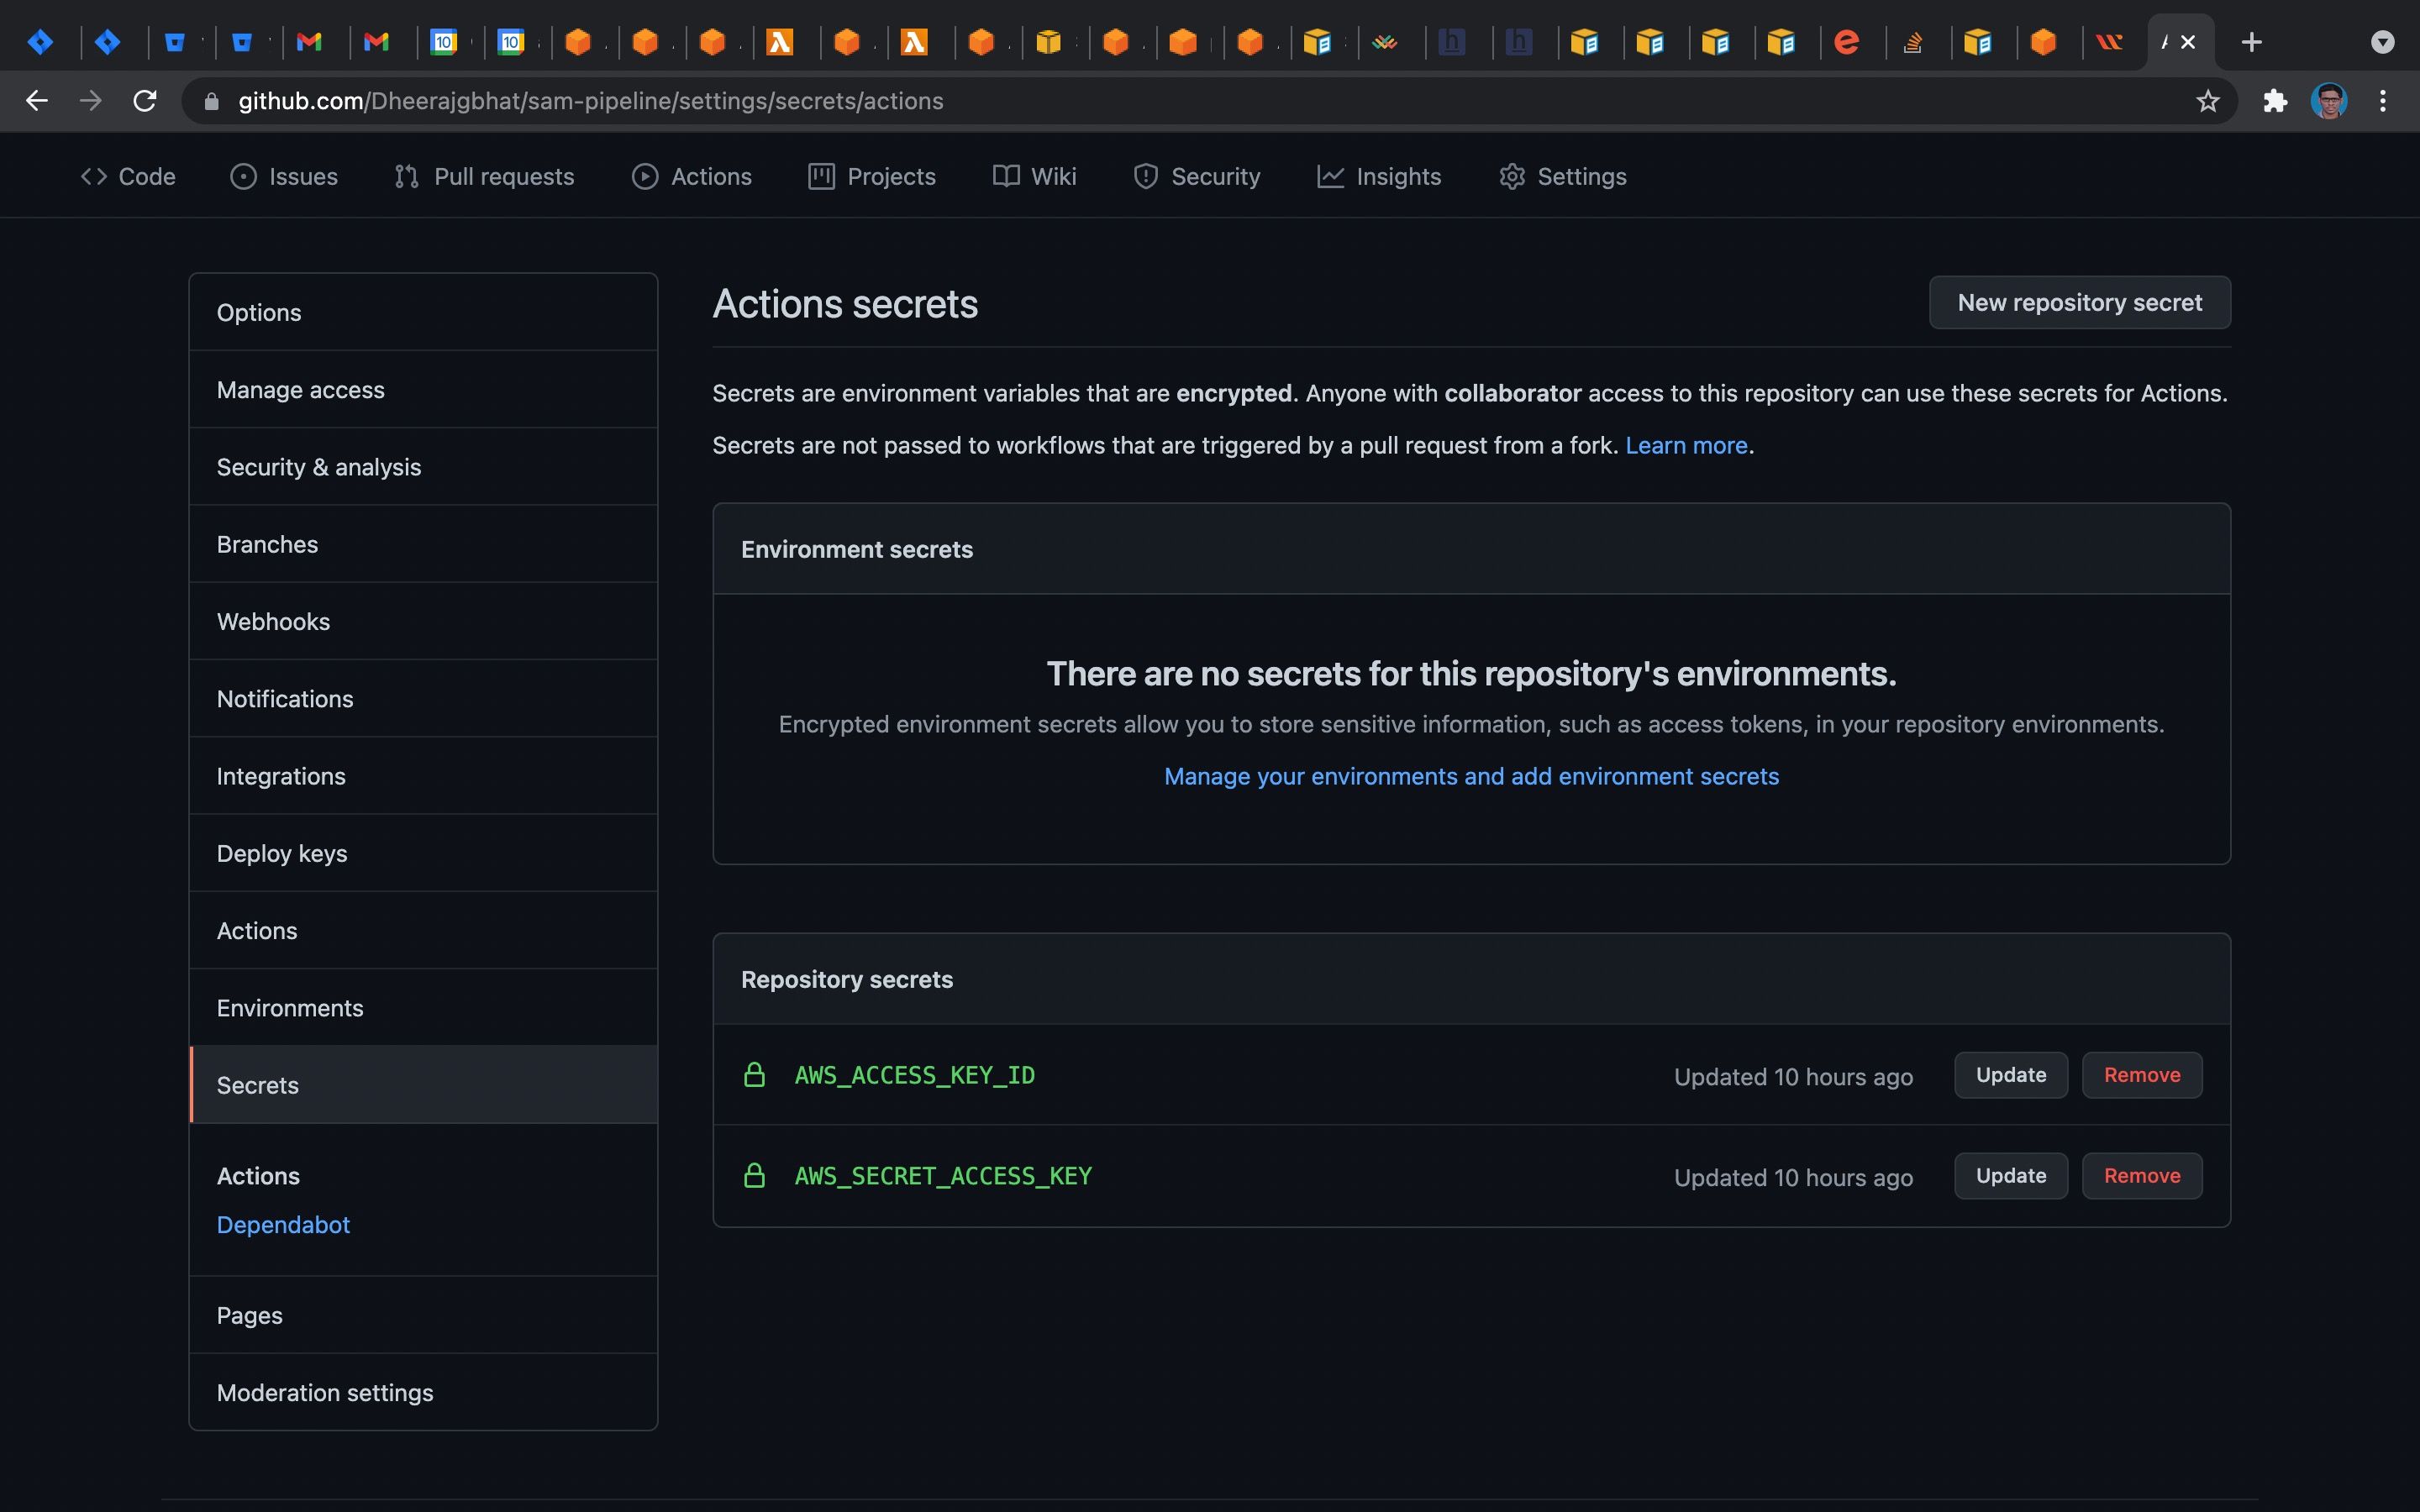
Step 4: Clone, Commit and Push the changes to GitHub
- Initialise the git in the SAM sample project folder,
git init
- Add the changes to the repository,
git add *
- Commit it with the proper message,
git commit -m "first commit"
- Create a branch
git branch -M main
- Clone the created repository with it,
git remote add origin https://github.com/Dheerajgbhat/sam-pipeline.git
- Push the changes,
git push -u origin main
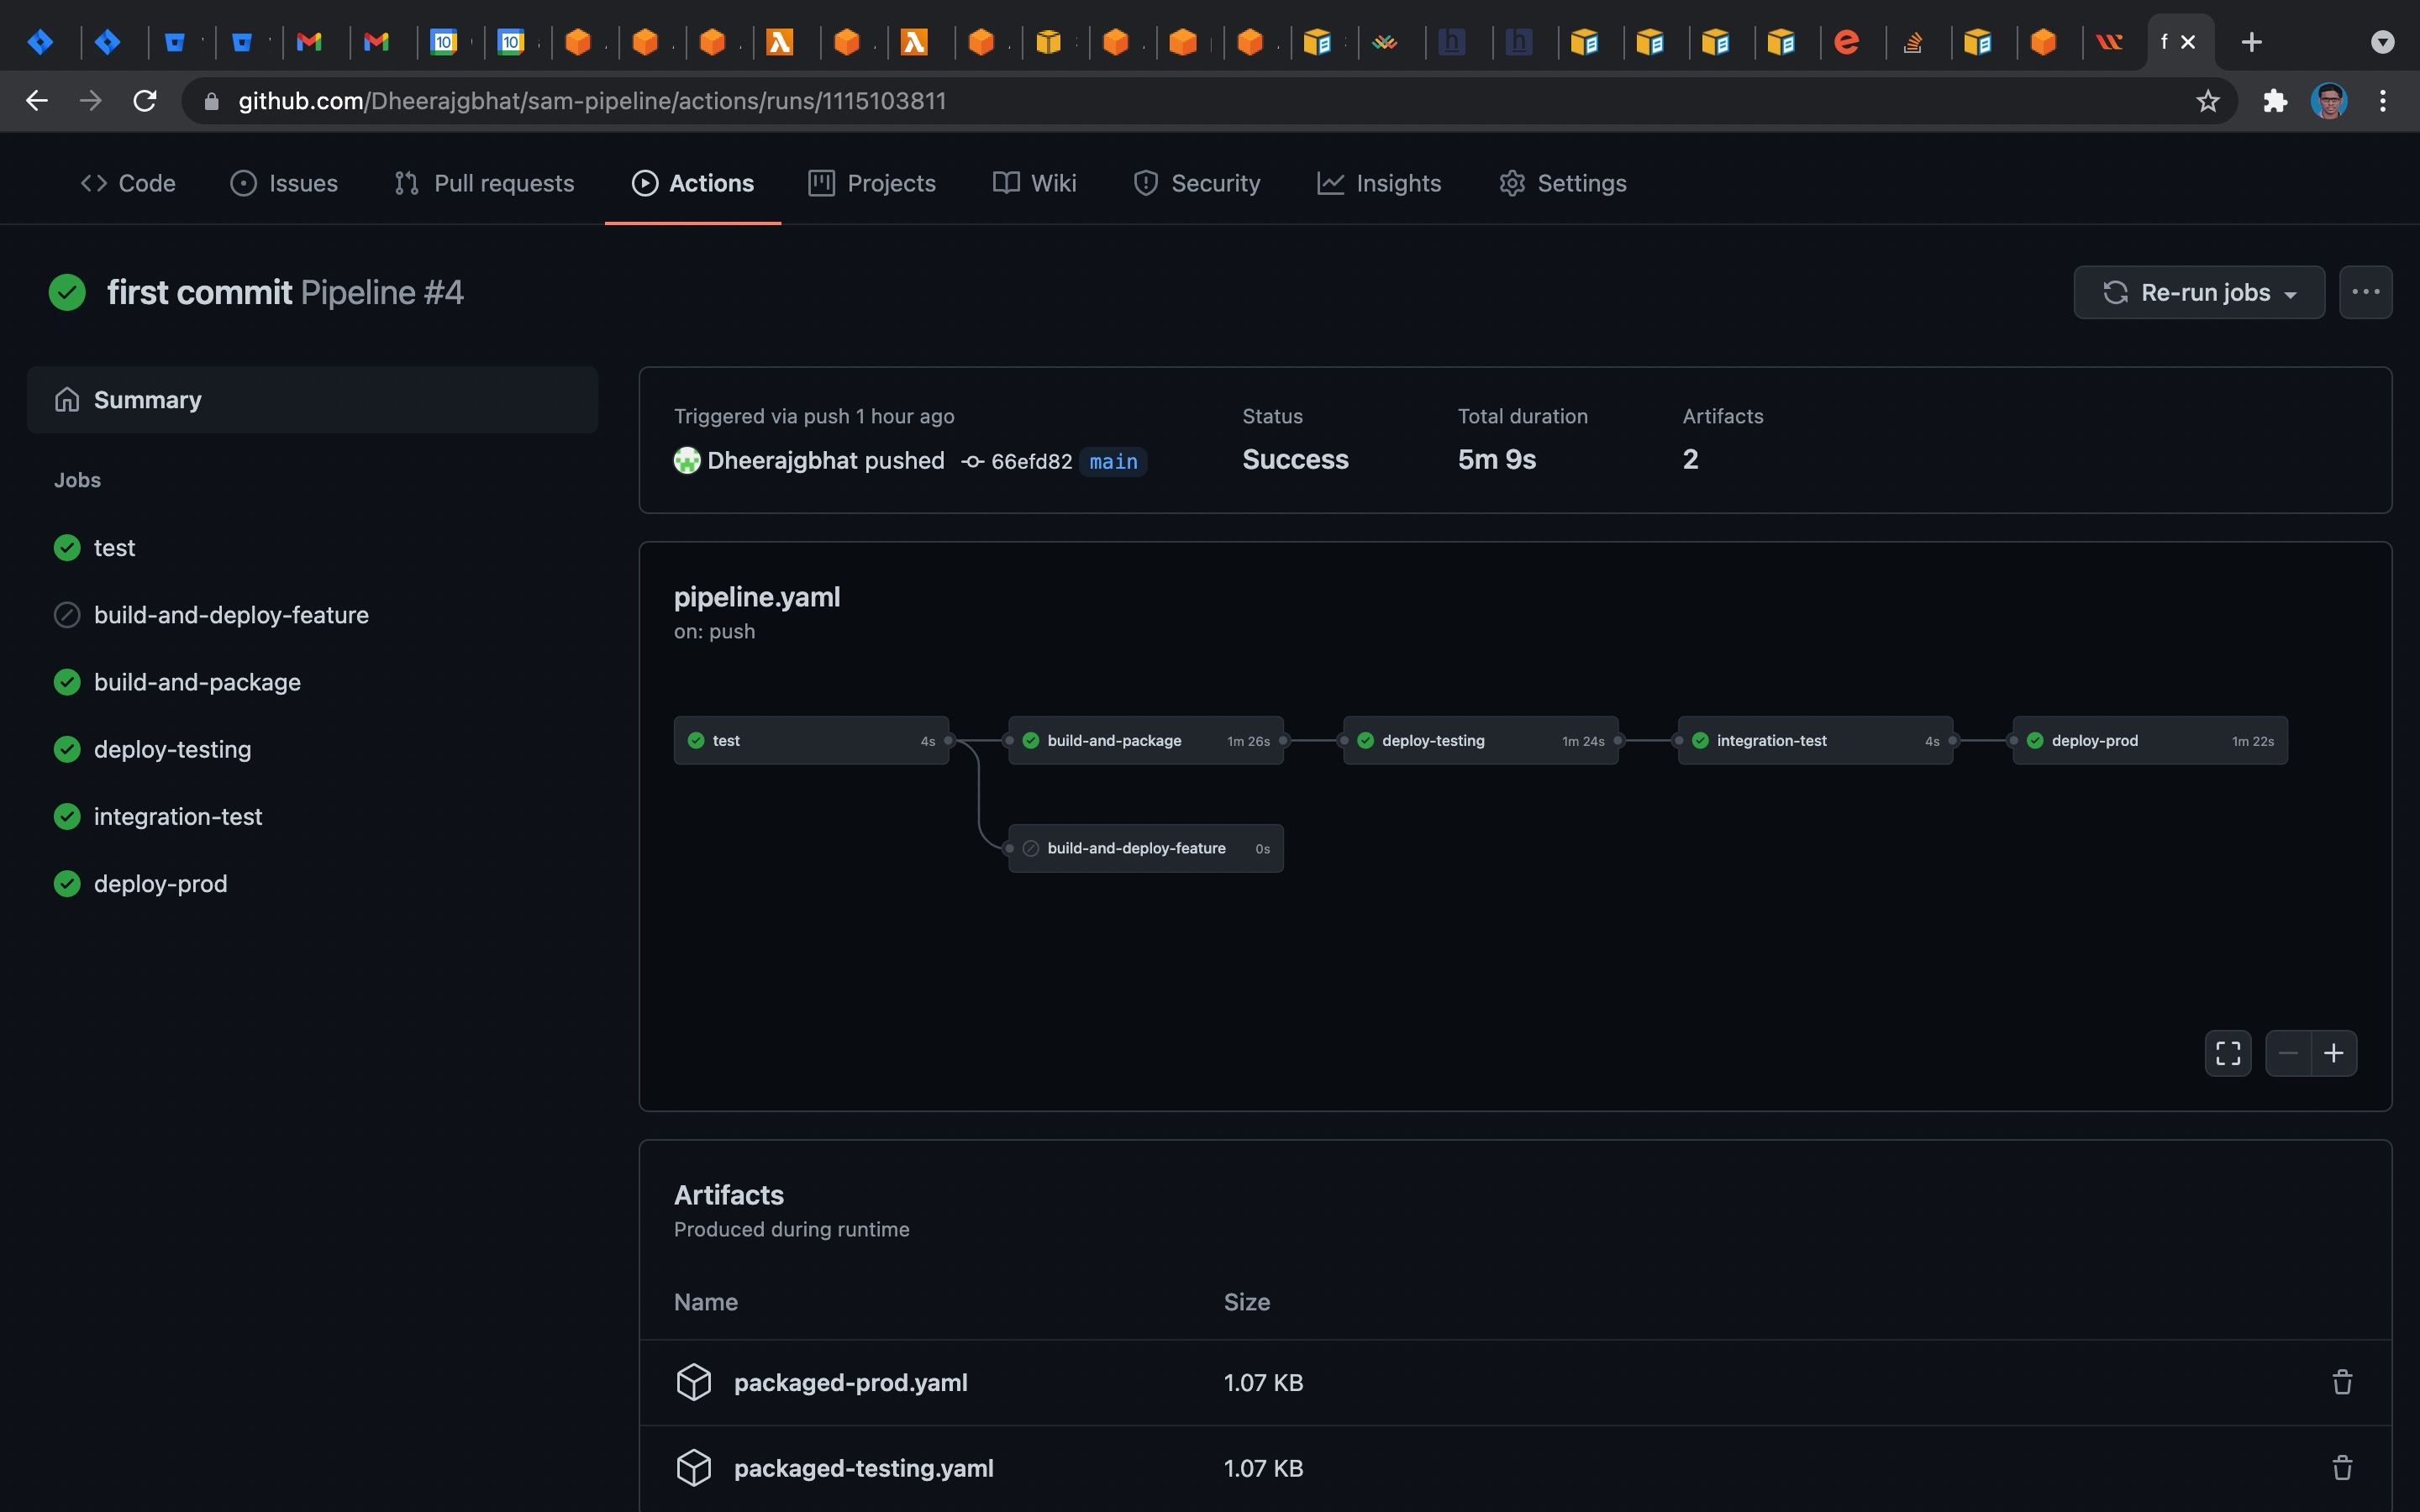
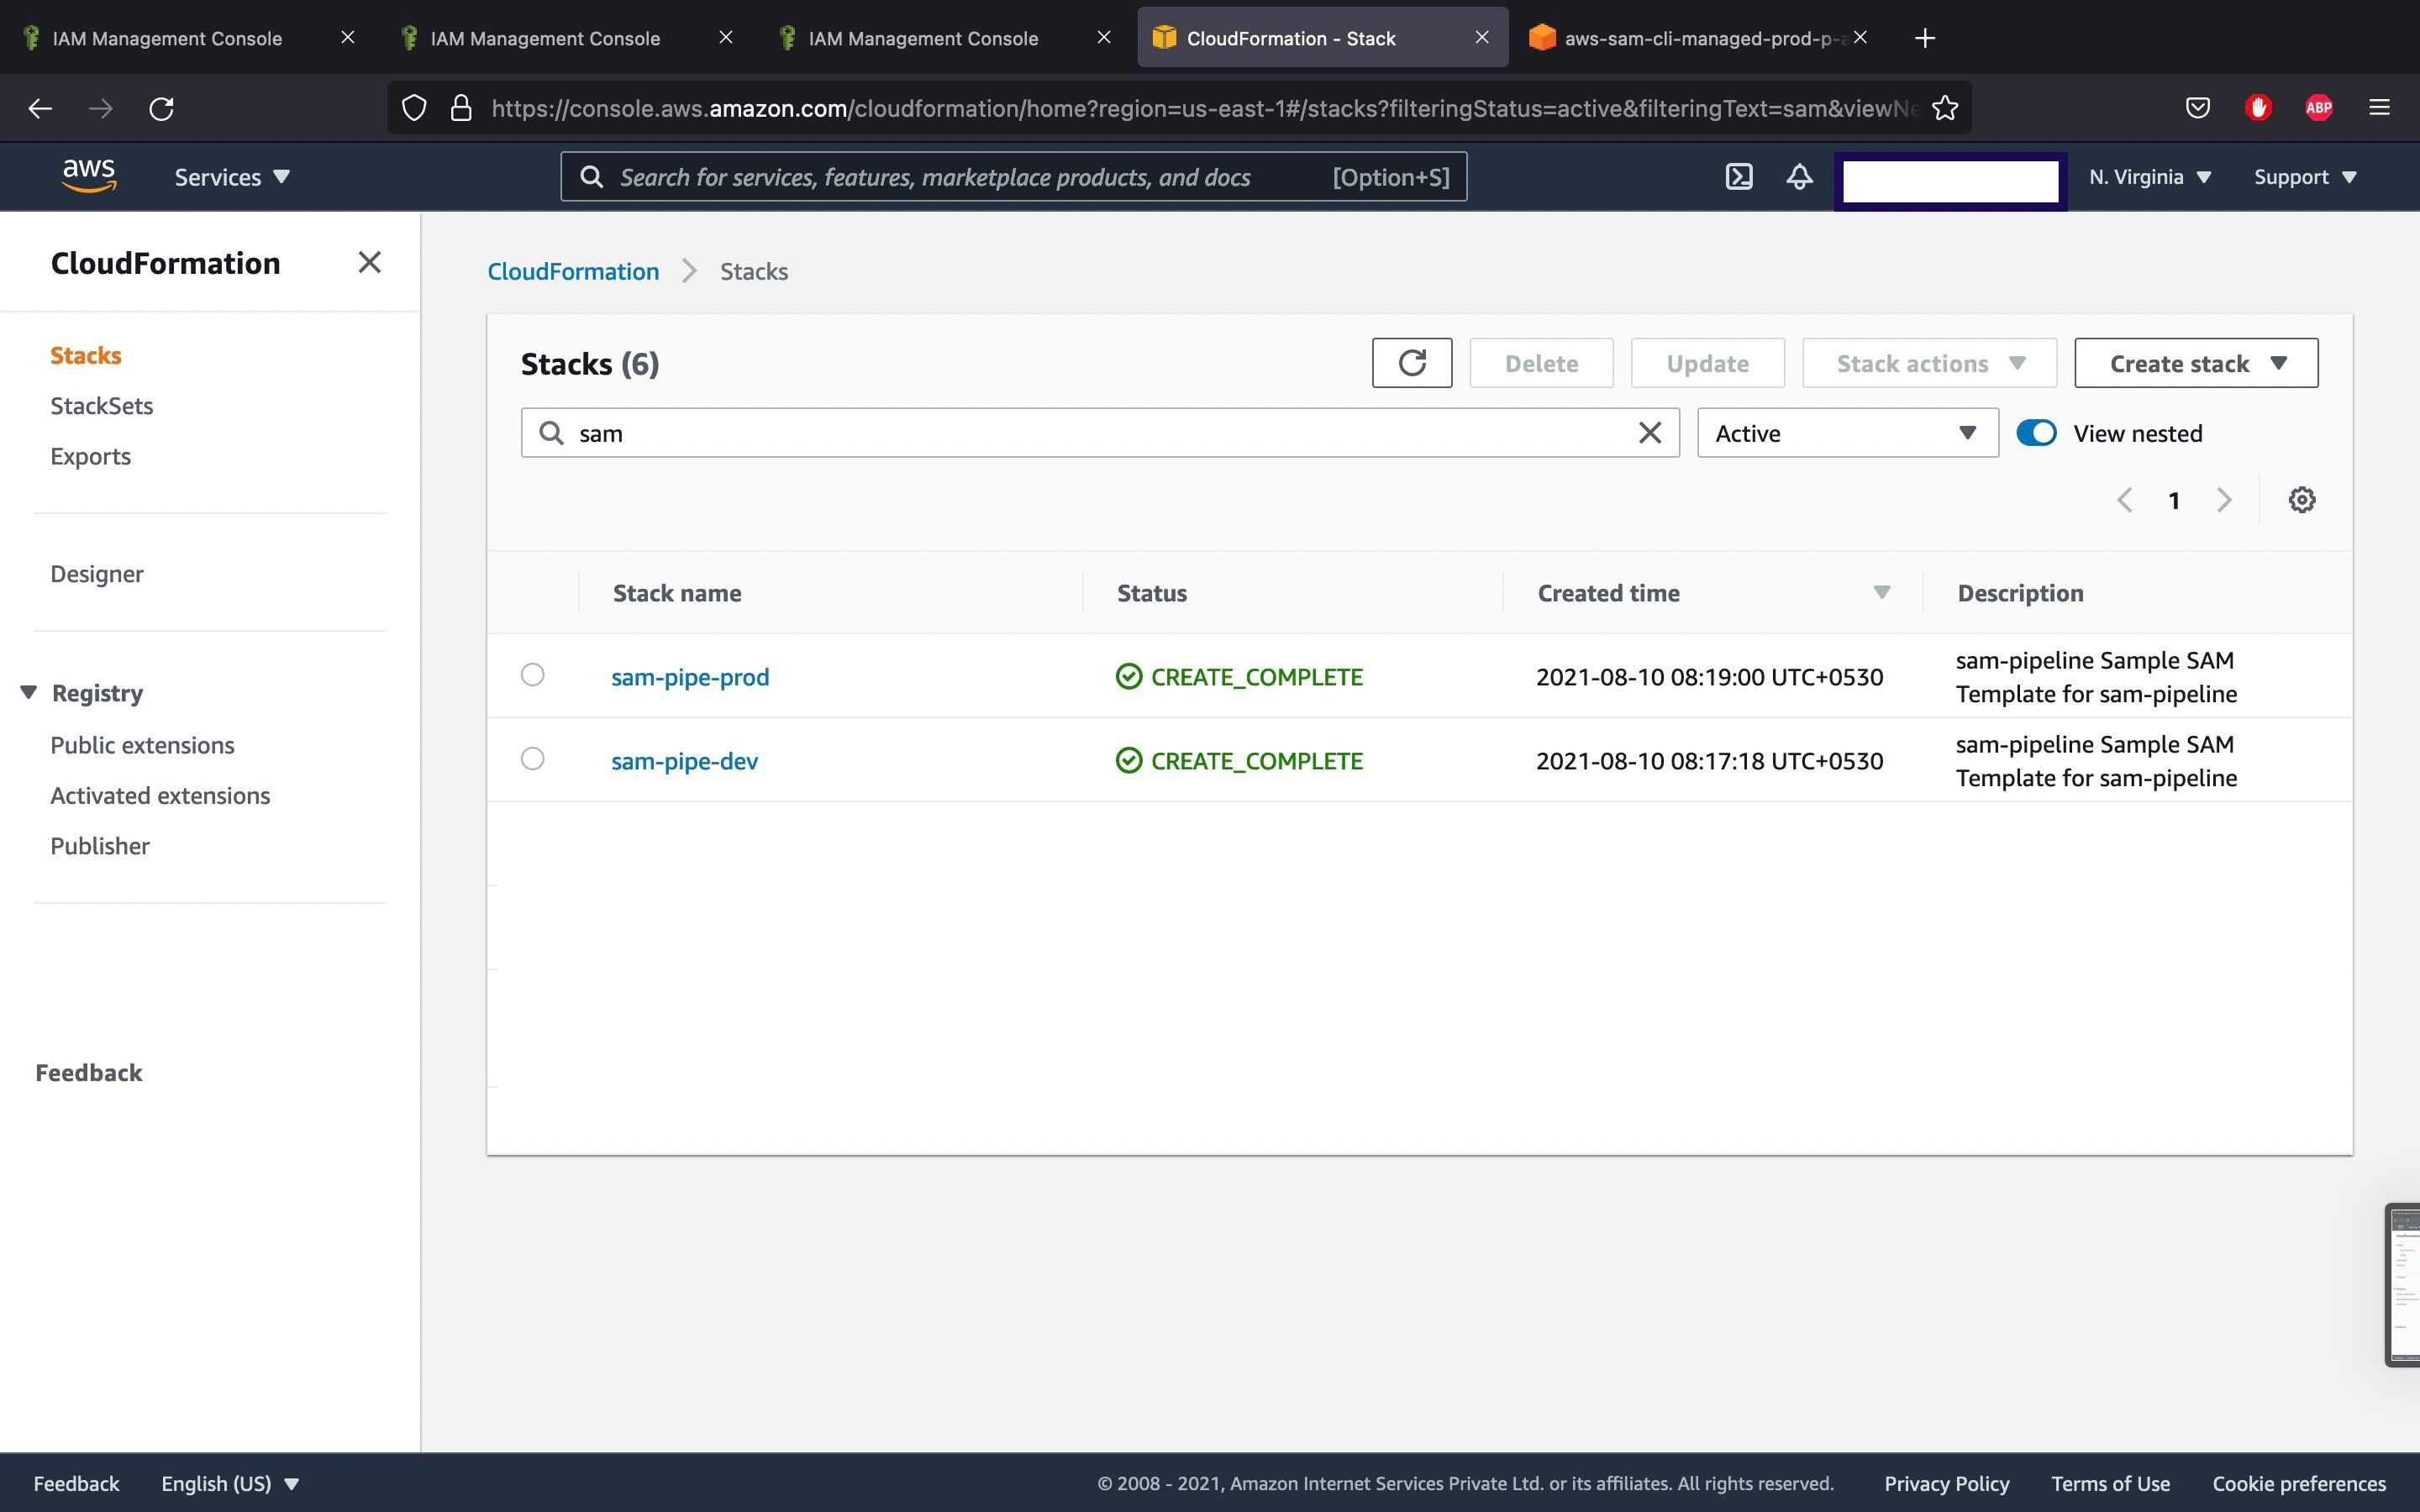
So once the changes are pushed to the GitHub repository, the actions will start, and the resources mentioned in the template and requires resources will be created in the Cloudformation stack. In the below image, we can see that two stacks were created with the name given
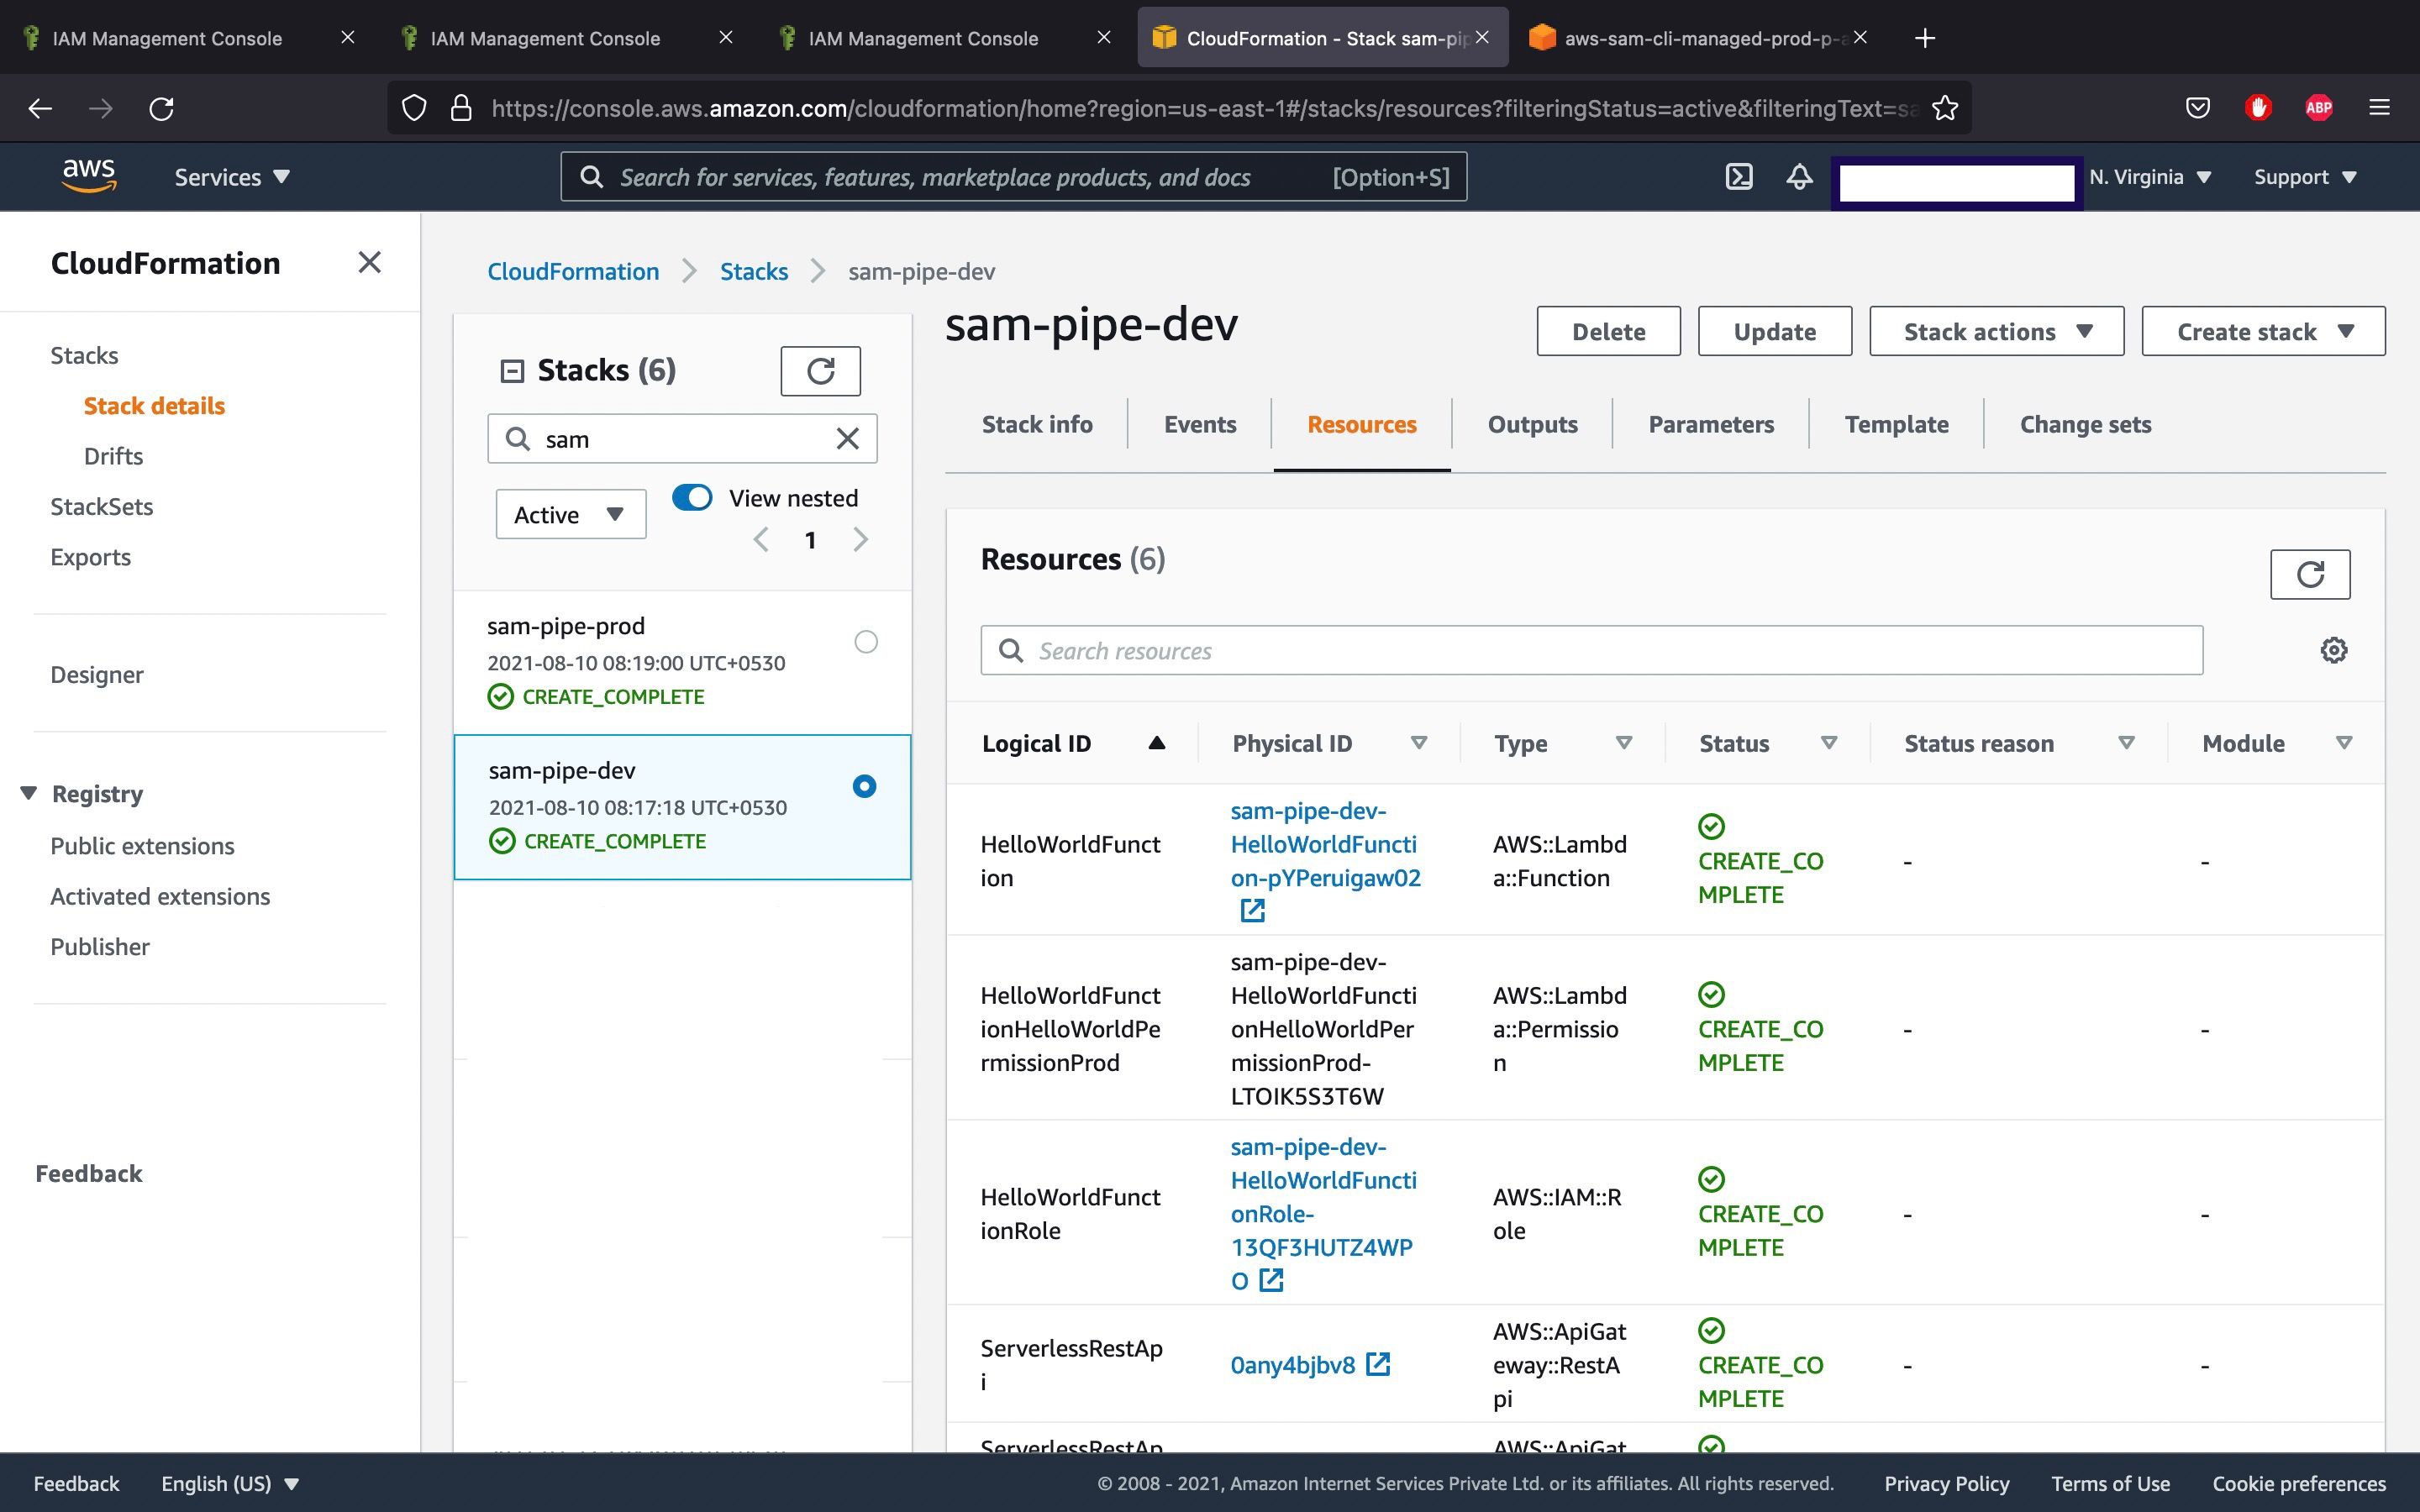
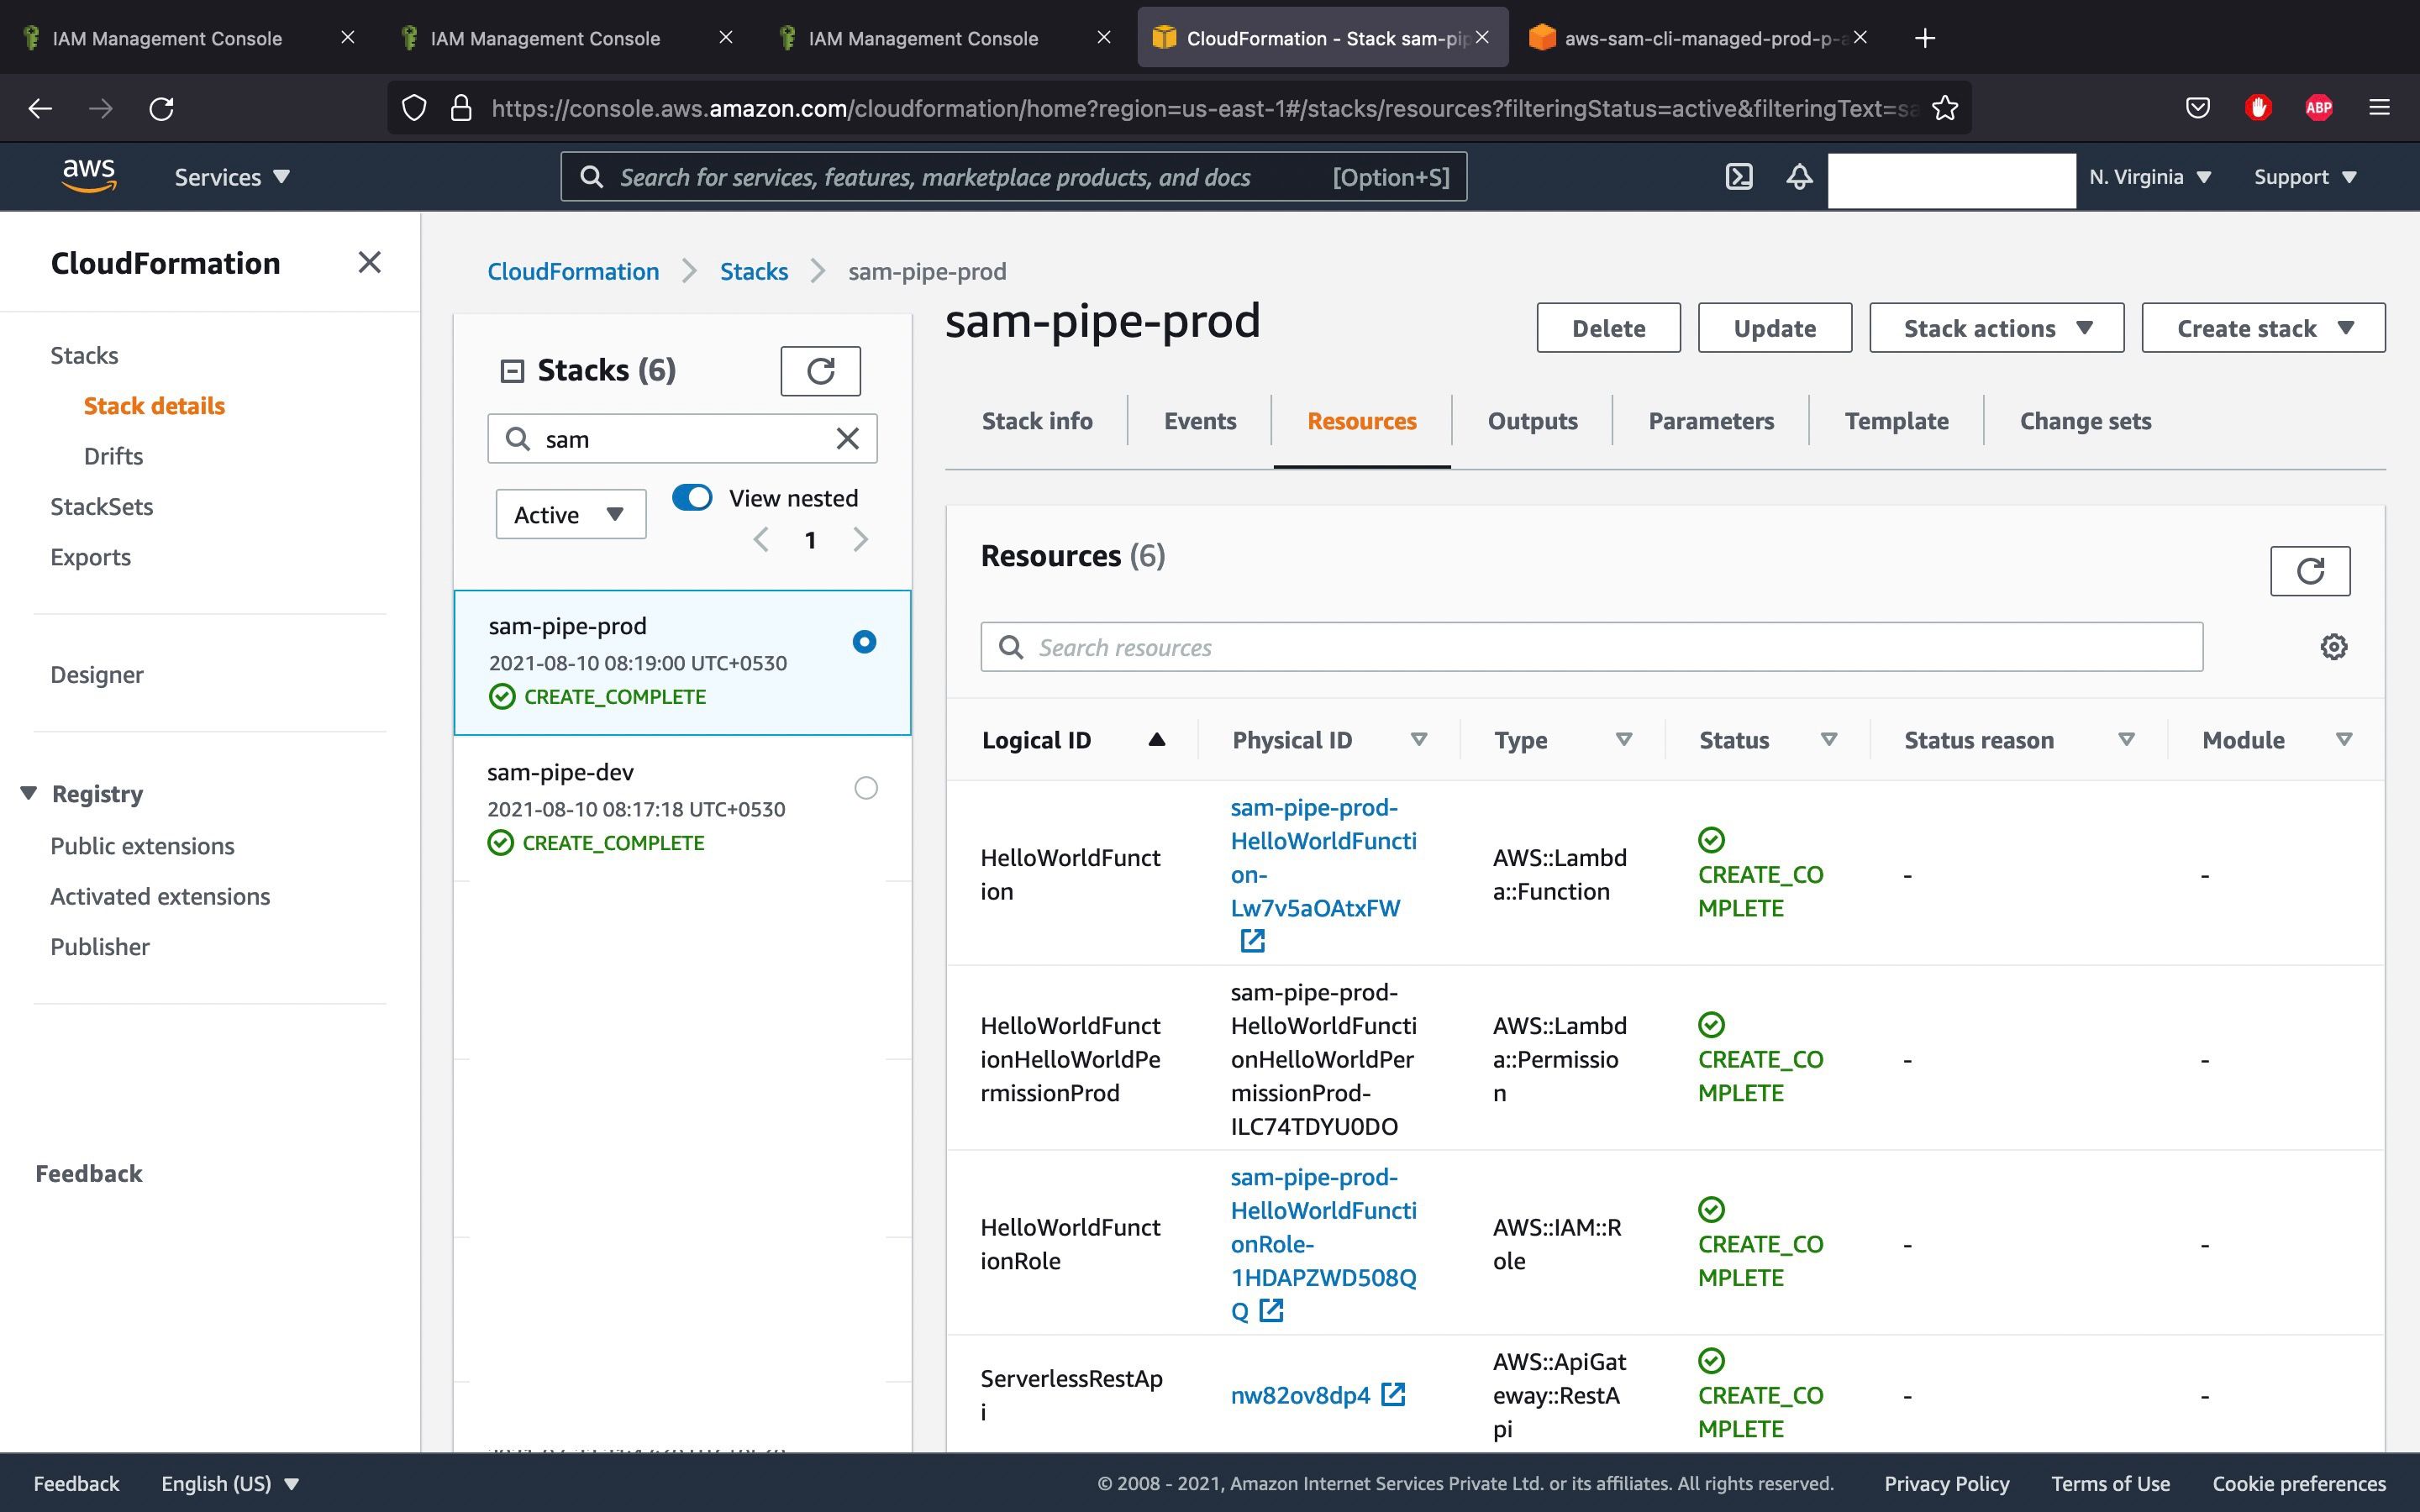
Then the resources mentioned in the templates are created in both the stacks
Conclusion
AWS SAM Pipeline is a feature that helps developers to create pipelines and generate template files that help in CI/CD. It provides a default set of pipeline templates that follow best practices and, by default will cover the basic steps in the software development lifecycle. It supports some of the existing best CI/CD systems like Jenkins, GitHub, etc.


