


Serverless Success Stories with Sharath from Azuga, a Bridgestone Company!
In my previous blog, we explored how to add Chat Memory to a RAG Application using AWS DynamoDB. We created a table, built a retriever and a tool with LangChain, attached it to our DynamoDB table and created a chatbot. The way we distinguished each chat was obviously from a unique partition key. But what if that is not enough? What if we need a Partition Key and a Sort Key to distinguish between the conversations?
That is what we are going to explore in this blog. We are going to have Composite Keys and give it to LangChain’s DynamoDBChatMessageHistory class. We will build a chatbot that is contextually aware of the questions at all times using a chain called create_history_aware_retriever. We will also track our experiments with LangSmith.
Why Composite Keys?
As mentioned above, using Composite Keys, which consist of a Partition and a Sort Key, allow us to distinguish between our conversations more efficiently. It also has other advantages:
- Uniqueness: While a unique Partition Key helps identify users, a Sort Key helps distinguish between different items that share the same Partition Key.
- Querying and Grouping: Composite keys allow for a more efficient querying and data retrieval. All conversations for a specific user can be grouped under the same Partition Key, while different sessions are separated by the Sort Key.
Getting Started
First, let us build a simple QA bot and then jump into building a contextually aware RAG Application.
The code we go through here is given in a Jupyter Notebook style, so it’s recommended to first build this application on a Notebook.
You need to install the below libraries:
langchain==0.2.1
langchain-community==0.2.1
langchain-core==0.2.3
langchain-openai==0.1.8
langchain-pinecone==0.1.1
langchain-text-splitters==0.2.0
langchainplus-sdk==0.0.20
langsmith==0.1.82
openai==1.30.1
pinecone-client==3.2.2
Now let’s set up LangSmith. Go to https://smith.langchain.com/ and signup with your account. Go to Settings and create a Personal Access Token and save it.
Now add it to the .env file along with others:
OPENAI_API_KEY="YOUR OPENAI_API_KEY"
PINECONE_API_KEY="YOUR PINECONE_API_KEY"
LANGCHAIN_API_KEY = "Token created on LangSmith"
LANGCHAIN_TRACING_V2 = "true"
LANGCHAIN_ENDPOINT = "https://api.smith.langchain.com"
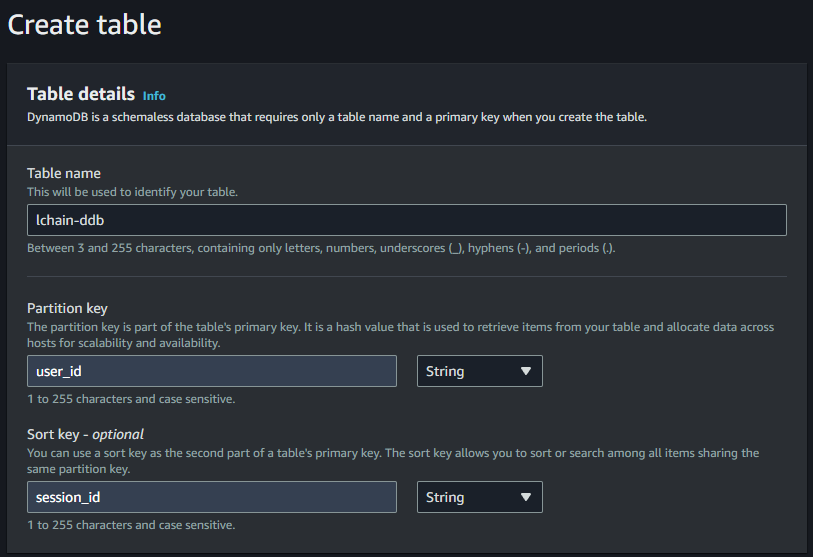
Setup DynamoDB
Now create a DynamoDB table with user_id and session_id and Partition and Sort Keys.
Building a basic Chat App
Spin up a Jupyter Notebook. Load your environment variables and initialize a Chat Model:
from langchain.prompts import ChatPromptTemplate, MessagesPlaceholder
from langchain_openai.chat_models import ChatOpenAI
from dotenv import load_dotenv
load_dotenv()

prompt = ChatPromptTemplate.from_messages(
    [
        ("system", "You are a helpful assistant."),
        MessagesPlaceholder(variable_name="history"),
        ("human", "{input}"),
    ]
)

chain = prompt | ChatOpenAI()
Let us import the Runnable(A unit of work in LangChain which can be invoked, streamed like how you do it for an LLM Model) and the DDB class to build the chain:
from langchain_core.runnables.history import RunnableWithMessageHistory
from langchain_community.chat_message_histories import DynamoDBChatMessageHistory
from langchain_core.runnables import ConfigurableFieldSpec

chain_with_history = RunnableWithMessageHistory(
    chain,
    lambda user_id, session_id: DynamoDBChatMessageHistory(
        table_name="lchain-ddb",
        session_id=session_id,
        key={"user_id": user_id, "session_id": session_id}
    ),
    input_messages_key="input",
    history_messages_key="history",
    history_factory_config=[
        ConfigurableFieldSpec(
            id="user_id",
            annotation=str,
            name="User ID",
            description="Unique identifier for the user.",
            default="",
            is_shared=True,
        ),
        ConfigurableFieldSpec(
            id="session_id",
            annotation=str,
            name="Conversation ID",
            description="Unique identifier for the conversation.",
            default="",
            is_shared=True,
        ),
    ]
)

# This is where we configure the user and session id
config = {"configurable": {"user_id": "user_1", "session_id": "session_1"}}
Quite a lot to unpack here. After we attach the model and prompt, we define the DynamoDBChatMessageHistory as a lambda, because we need it as a callable, and also define an extra kwarg called history_factory_config. This is because by default, RunnableWithMessageHistory runs with just session_id. The history_factory_config kwarg helps us define additional field(user_id here) for the memory key. Also, unless we define the optional argument key with our Composite Keys in DynamoDBChatMessageHistory, it just takes session_id as the PK and goes ahead with the operation.
Now invoke the chain:
chain_with_history.invoke({"input": "Hi, I'm Pradhyumna"}, config=config)
AIMessage(content='Hello Pradhyumna! How can I assist you today?')
Testing the memory now:
chain_with_history.invoke({"input": "Can you tell me my name?"}, config=config)
AIMessage(content='Yes, your name is Pradhyumna. How can I assist you further, Pradhyumna?')
Bit of an eerie response, but it’s done! Let us have a look at LangSmith now. Go to the Projects in LangSmith and select the default project. You will see a list of all your runs.
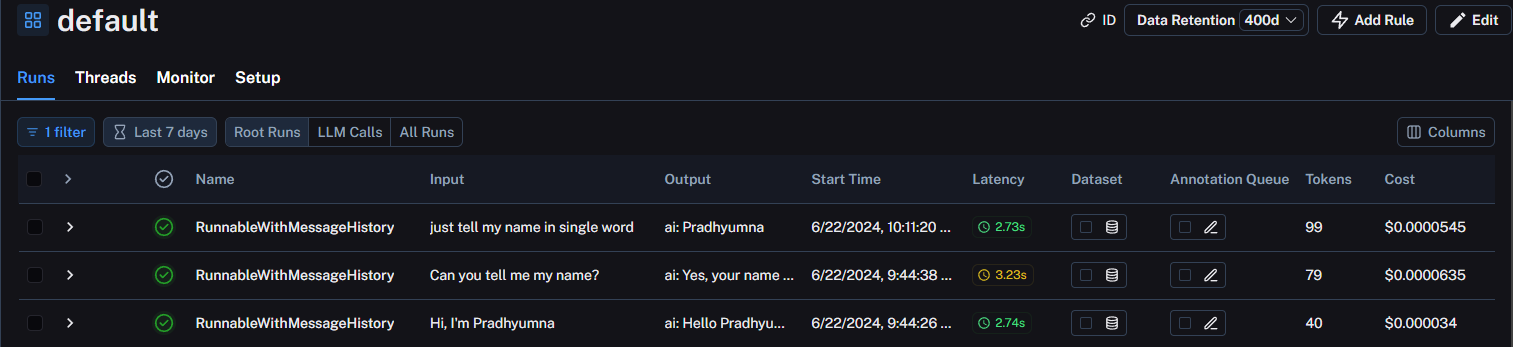
As you can see, LangSmith tells us a lot of things such as the model latency, tokens consumed, cost incurred along with input and output.
Open the latest run to see the breakdown of the entire chain:
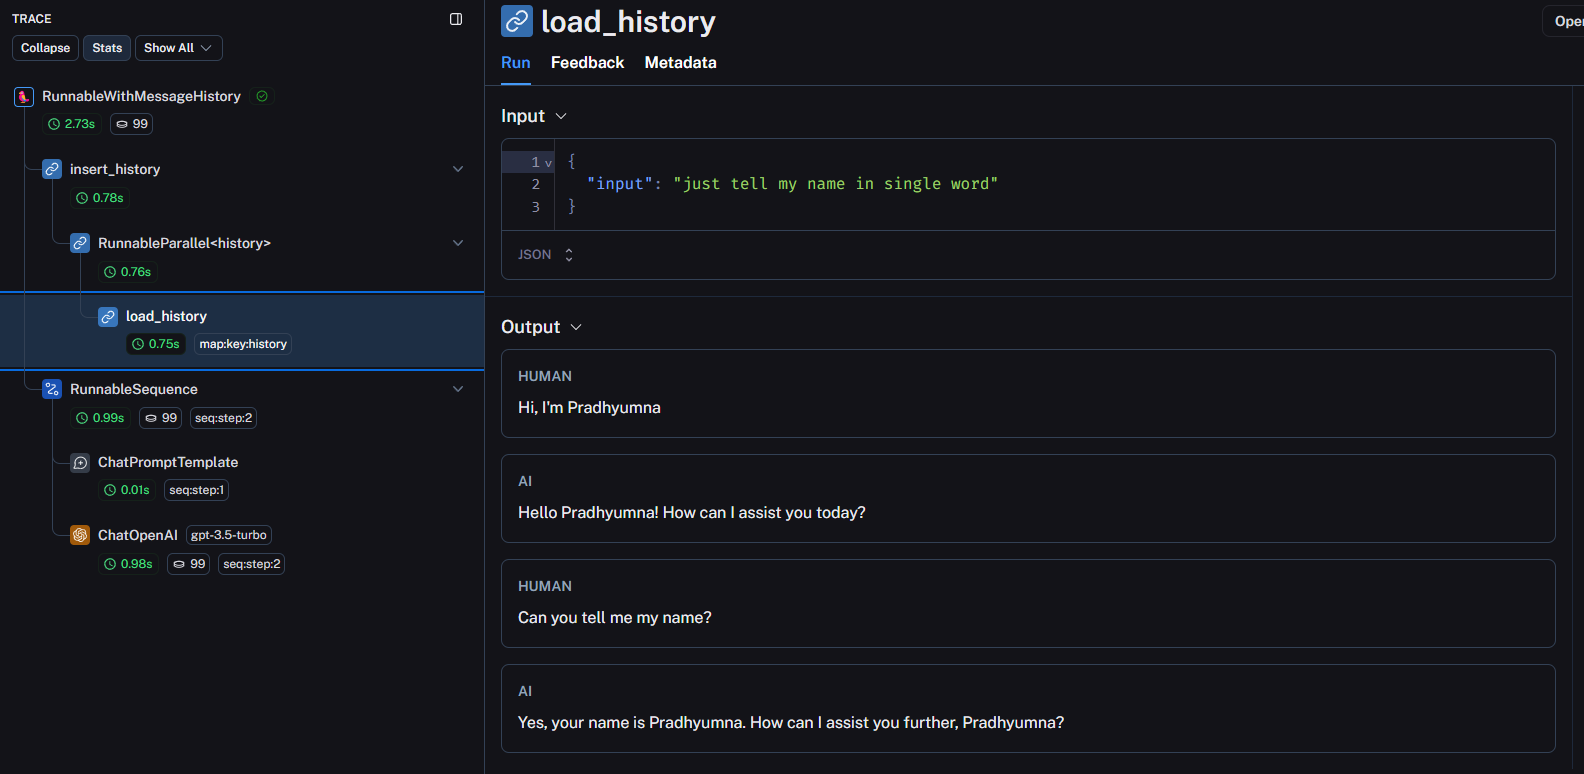
Just like how I’ve expanded the load_history, task, you can click on other steps of the chain to see how the entire conversation flows from start to the end.
Building and deploying a contextually aware chatbot
Now that we have built a basic qa app, let us dive into something more complex. As mentioned earlier, we’ll build a chatbot where it always has the right context when asked a question. Here we’ll be following LangChain’s documentation about chat history, so feel free to refer to that too.
Collecting the data
First, we need to prepare our data that we build the application on. The idea is to collect the data, load it as LangChain Documents, and upload to a Vector DB. There are two simple ways to go on about this, atleast for the sake of this blog:
- Scrape a website manually and store it in txt files and then load it as a document.
- Use LangChain’s RecursiveUrlLoader.
The script for scraping a website using bs4 can be found here.
If you are following step 1, this is how you load the data after scraping:
from langchain_text_splitters import RecursiveCharacterTextSplitter

all_docs = []
for dir, subdirs, files in os.walk("scraped_pages"):
    for file in files:
        if file.endswith(".txt"):
            file_path = os.path.join(dir, file)
            with open(file_path, "r") as f:
                all_docs.append(f.read())

print(f"Loaded {len(all_docs)} documents")

text_splitter = RecursiveCharacterTextSplitter(chunk_size=750, chunk_overlap=30)
docs = text_splitter.create_documents(all_docs)
print(f"Split documents into {len(docs)} chunks")
If you want to use the RecursiveUrlLoader do this:
from langchain_community.document_loaders import RecursiveUrlLoader
from bs4 import BeautifulSoup
import re

def bs4_extractor(html: str) -> str:
    soup = BeautifulSoup(html, "lxml")
    return re.sub(r"\n\n+", "\n\n", soup.text).strip()


loader = RecursiveUrlLoader("https://www.example.com", extractor=bs4_extractor, max_depth=5)
all_docs = loader.load()

splitter = RecursiveCharacterTextSplitter(chunk_size=1000, chunk_overlap=100)
docs = splitter.transform_documents(all_docs)
print(f"Split documents into {len(docs)} chunks")
After splitting, you should see an output like this:
Split documents into 6665 chunks
Chunks basically are the segments of text that have been split based on specific criteria, such as size or content The number of chunks here depend on the website as well as the chunk_size and chunk_overlap.chunk_size is the specified length or size at which the text is split into segments. chunk_overlap is the number of tokens that overlap between adjacent chunks when splitting. Overlap is needed to ensure continuity and coherence in the information extracted from the text. By having an overlap, we make sure that we’re preserving the context between the chunks.
Loading the data to Pinecone
If you haven’t created a Pinecone Index yet, go to https://app.pinecone.io/ and create an index. Here we are using the text-embedding-3-small model so for the Vector Dimensions, you have to set 1536 as the number. The dimension of an embedding vector is essentially the number of values (or components) in that vector. When we say that an embedding model has a dimension of 1536, it means that each embedding produced by this model is a vector with 1536 components.
After creating the index, get embeddings for your data and upload it to Pinecone and initialize the retriever. If you encounter any error from Pinecone saying that the metadata size is too big, just know that you have to reduce your chunk size.
from langchain_pinecone import PineconeVectorStore
from langchain_openai import OpenAIEmbeddings, ChatOpenAI

embeddings = OpenAIEmbeddings(model="text-embedding-3-small")

vectorstore = PineconeVectorStore.from_documents(docs, embeddings, index_name="website-data")
retriever = vectorstore.as_retriever()
If you’ve done this already, this is how you initialize the retriever:
vectorstore = PineconeVectorStore(index_name="website-data", embedding=embeddings)
retriever = vectorstore.as_retriever(search_kwargs={"k": 5})
Question Contextualization
We will create a chain that takes conversation history, as well as the latest question and reformulates it in case it refers to any previous conversations. We use the create_history_aware_retriever chain here, where we attach the retriever to it.
from langchain.chains import create_history_aware_retriever

llm = ChatOpenAI(model="gpt-3.5-turbo", streaming=True)
contextualize_q_system_prompt = """Given a chat history and the latest user question \
which might reference context in the chat history, formulate a standalone question \
which can be understood without the chat history. Do NOT answer the question, \
just reformulate it if needed and otherwise return it as is."""
contextualize_q_prompt = ChatPromptTemplate.from_messages(
    [
        ("system", contextualize_q_system_prompt),
        MessagesPlaceholder("chat_history"),
        ("human", "{input}"),
    ]
)
history_aware_retriever = create_history_aware_retriever(
    llm, retriever, contextualize_q_prompt
)
Now, we’ll build the entire chain. We are doing two things here. One, we’re using create_stuff_documents_chain to generate a question_answer_chain, with context, chat_history, and input which accepts the context, chat history and the input query to generate an answer. Two, we use create_retrieval_chain and connect history_aware_retriever and question_answer_chain in that order. This chain also retains intermediate outputs such as the retrieved context for convenience.
from langchain.chains import create_retrieval_chain
from langchain.chains.combine_documents import create_stuff_documents_chain

template = """
You are a Car Recommender chatbot. You are helping a user find a car that fits their needs.
The context provided to you is a mixture of car specs data as well as reviews and opinions on cars. Make sure you understand this before answering the user's question.
You should answer the question based only on the following context provided to you. If you don't have enough information to answer the question, you should say so.

Give the output in a nice markdown format.
Context:
{context}
####----####
"""
prompt = ChatPromptTemplate.from_messages(
    [
        ("system", template),
        MessagesPlaceholder("chat_history"),
        ("human", "{input}"),
    ]
)

question_answer_chain = create_stuff_documents_chain(llm, prompt)

rag_chain = create_retrieval_chain(history_aware_retriever, question_answer_chain)
Since my data is about cars, I have crafted my prompt that suits my data best.
Connecting it all together
Now that we have defined almost everything, let’s just define a Runnable, attach the memory and invoke it.
conversational_rag_chain = RunnableWithMessageHistory(
    rag_chain,
    lambda user_id, session_id: DynamoDBChatMessageHistory(
        table_name="lchain-ddb",
        session_id=session_id,
        key={"user_id": user_id, "session_id": session_id}
    ),
    input_messages_key="input",
    history_messages_key="chat_history",
    output_messages_key="answer",
    history_factory_config=[
                    ConfigurableFieldSpec(
                        id="user_id",
                        annotation=str,
                        name="User ID",
                        description="Unique identifier for the user.",
                        default="",
                        is_shared=True,
                    ),
                    ConfigurableFieldSpec(
                        id="session_id",
                        annotation=str,
                        name="Conversation ID",
                        description="Unique identifier for the conversation.",
                        default="",
                        is_shared=True,
                    ),
                ],
)
config = {"configurable": {"user_id": "user2", "session_id": "session1"}}
conversational_rag_chain.invoke(
    {"input": "What are some good SUVs in Hyundai?"},
    config=config,
)["answer"]
This is the answer:
### Recommended Hyundai SUVs:
1. **Hyundai Tucson:**
   - Fundamentally well-sorted premium executive SUV.
   - Offers space, comfort, and strong powertrains.
   - Flagship model with clever tech features like ADAS.
   - Bestselling Hyundai globally in 2021.
   - Assembled in India, costs around Rs 34 lakh.
   - Uses a 2.0-litre diesel engine with AWD.
   - Elevates Hyundai into a higher league with refined interiors and great tech.

2. **Hyundai Creta:**
   - Easy to drive in town with absorbent low-speed ride.
   - Good build quality, comfortable interiors, and well-equipped.
   - Offers a relaxing and easy driving experience.
   - Competent handling and suitable for urban environments.

3. **Hyundai Seltos:**
   - Shares platform with Creta, but slightly updated.
   - Competent handling with neutral driving dynamics.
   - Offers a comfortable ride and well-equipped interiors.
   - Suitable for daily commuting and urban driving scenarios.

Please note that the Hyundai Tucson stands out as a premium SUV offering space, comfort, and strong powertrains, making it a top choice for those seeking a well-rounded and sophisticated driving experience.
Let’s ask some follow-up question now:
config = {"configurable": {"user_id": "user2", "session_id": "session1"}}
conversational_rag_chain.invoke(
    {"input": "In Toyota?"},
    config=config,
)["answer"]
The response:
### Good SUVs in Toyota:

1. **Toyota Urban Cruiser Hyryder:**
   - Co-developed with Maruti, offering a well-rounded practical SUV.
   - Features modern design, comfortable interior, and generous equipment list.
   - Standout feature is the smooth hybrid technology.
   - Lacks in performance compared to turbo-petrol rivals but excels in other areas.

2. **Toyota Fortuner:**
   - Popular choice known for its eager performance and off-road capability.
   - Considered the default choice in its segment with proven reliability.
   - Offers broad, supportive, and comfortable seats with good ventilation.
   - Not the most sophisticated SUV in terms of feel but valued for ownership ease and resale value.

Toyota offers SUVs that cater to different needs, with a focus on practicality, comfort, and reliability, making them popular choices in their respective segments.
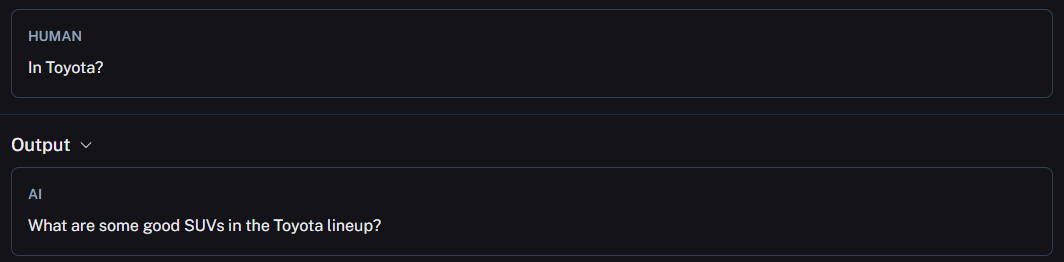
If you noticed, I just asked “In Toyota?” instead of being descriptive. Go to LangSmith, and under retrieval_chain, select ChatOpenAI to see how this question got reformulated:
 This is a rather basic example but it’s sufficient enough to demonstrate how to contextualize and query your knowledgebase. You can remove the [“answer”] key to see the entire flow of the qa.
Streaming
To stream your outputs, you can use the stream method of the chain:
for answer in conversational_rag_chain.stream({"input": "In Toyota?"}, config=config):
        # Process and stream the output here
        for key in answer:
                if key == "answer":
                        print(answer['answer'], end="")
Deploying on AWS Lambda with Streaming
To deploy on AWS Lambda with Streaming, you have to deploy it on a custom image via AWS SAM. To know more about Lambda Streaming with Python, I highly recommend this blog written by my colleague.
This is how your SAM Project folder structure should be:
lchain-ddb/
├── src/
│   ├── __init__.py
│   ├── bootstrap
│   ├── Dockerfile
│   ├── handler.py
│   ├── requirements.txt
├── template.yaml
Your Lambda Function code is in the handler.py file. Everything we did so far has been dumped in this single Python file with one exception. To stream the outputs back to us, I’m using the yield keyword in the end:
for answer in conversational_rag_chain.stream({"input": question}, config=config):
        for key in answer:
                if key == "answer":
                        yield answer['answer']
As you can see in the file structure above, other than the handler.py, you need three things. bootstrap, Dockerfile and a requirements.txt.
bootstrap basically facilitates streaming. It continuously polls for the Lambda function and takes action when an event is received. In the Dockerfile, we pull the image from AWS public ECR repo, install python and the libraries from the requirements.txt. Make sure Docker is running.
To build and deploy, enter these in the terminal:
sam build --use-container
sam deploy --guided #For the first time, then sam deploy
Enter all the prompts asked in the terminal and when it finally deploys the function, you should see an output similar to this:
CloudFormation outputs from deployed stack
-----------------------------------------------------------------------------------------------------------------------------------------------------------
Outputs
-----------------------------------------------------------------------------------------------------------------------------------------------------------
Key                 ResponseLambdaUrl
Description         -
Value               https://abcdefgh1234567890.lambda-url.us-east-1.on.aws/
-----------------------------------------------------------------------------------------------------------------------------------------------------------
You can use this Streamlit file to test your Lambda. Run this after installing the Streamlit python library:
streamlit run stream.py
When the app pops up on the browser, enter all the data along with your Lambda Function URL and ask your question.
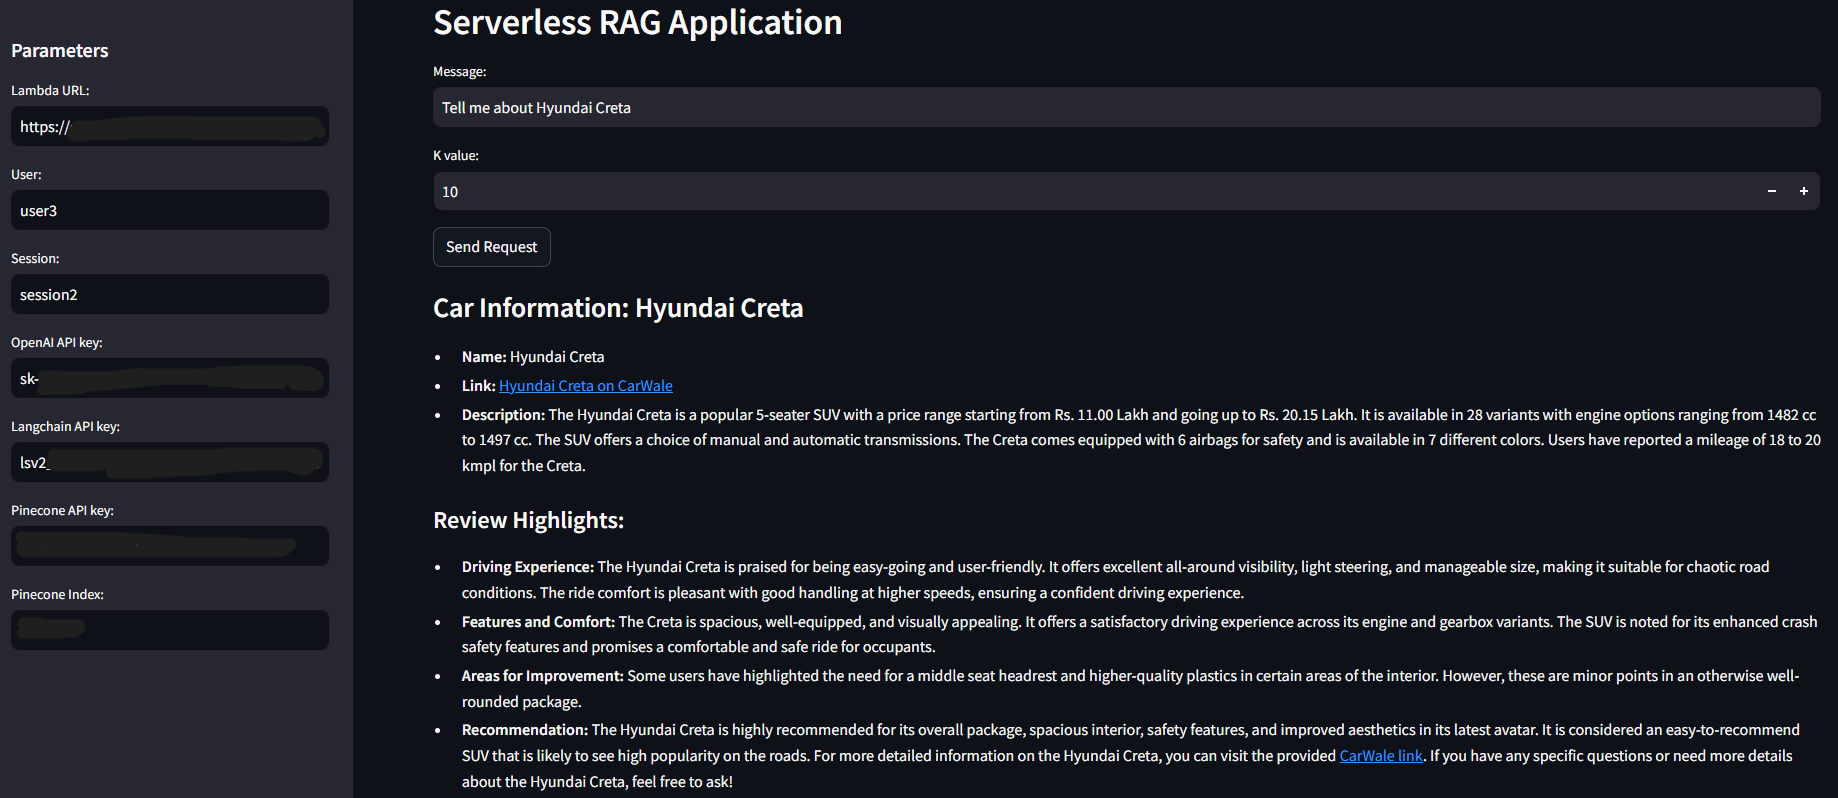
I have also added an expander which shows the chat history so make sure that you have given proper table name in stream.py and loaded your AWS credentials to your system.
Conclusion
We successfully expanded upon the DynamoDB backed chat memory to include both Partition and Sort key. We also built a contextually aware RAG application and also tracked our experiments with LangSmith. One downside of this application is that it can be slow due to the reformulating step in the middle. If you remove this step and figure out a way to preserve the context, you can eliminate the latency altogether. One last thing, go to your DynamoDB table and have a look at your chat history to know how LangChain stores interactions between users and models.
Thanks for reading! Reach out to me at X(Twitter) or LinkedIn if you have any feedback!


